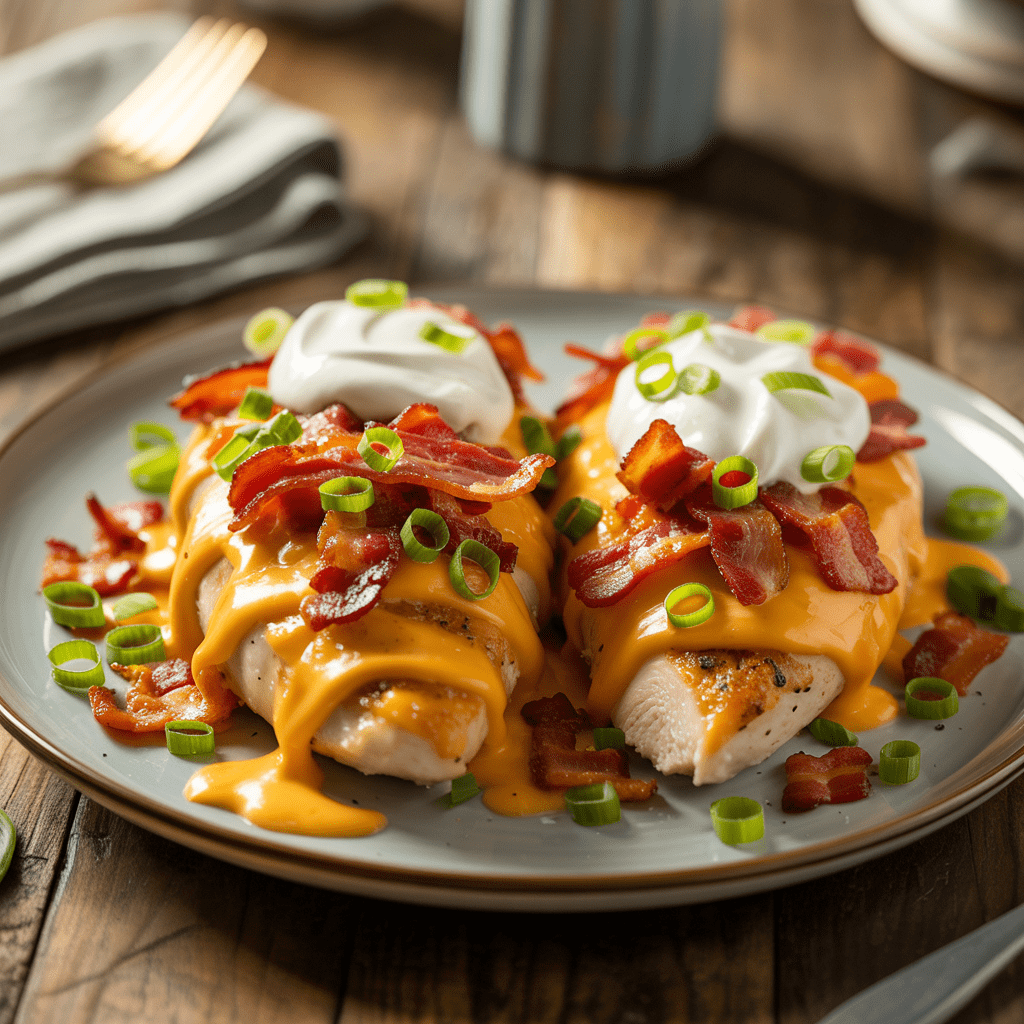
Busy night, hungry crowd, minimal dishes. That is exactly where these loaded chicken breasts shine. Thin, quickly seared cutlets get blanketed with smoky bacon, melty cheddar, and a cool, tangy topping so dinner hits the table in a true quarter hour. This guide gives you the exact method, smart prep shortcuts, and pro-level safety tips so you can cook fast without sacrificing flavor or nutrition.
Loaded Chicken Breasts
- Prep time: 5 minutes
- Cook time: 8 to 10 minutes
- Total time: 13 to 15 minutes
- Serving: 4 (scales easily)
Time guarantee notes: The 15 minute promise assumes thin chicken cutlets (or pounded breasts to ½ inch), a preheated pan, and toppings staged while the chicken sears.
Insight of Loaded Chicken Breasts
What “loaded” means here:
Lean chicken is the base. “Loaded” refers to savory layers that add texture and punch: crisp bacon, sharp cheddar, green onions, and a quick yogurt-ranch drizzle. You get the “loaded baked potato” vibe in a protein-forward format.
Why it matters:
- Speed: Using cutlets cuts cooking time dramatically.
- Balance: A high-protein main with controlled portions of fat and dairy creates a satisfying meal that does not feel heavy.
- Consistency: A simple, repeatable method produces juicy chicken every time.
Safety anchor: Chicken is done at 165°F (74°C) in the thickest part. Use an instant-read thermometer for accuracy and consistency.
Ingredients
For 4 servings
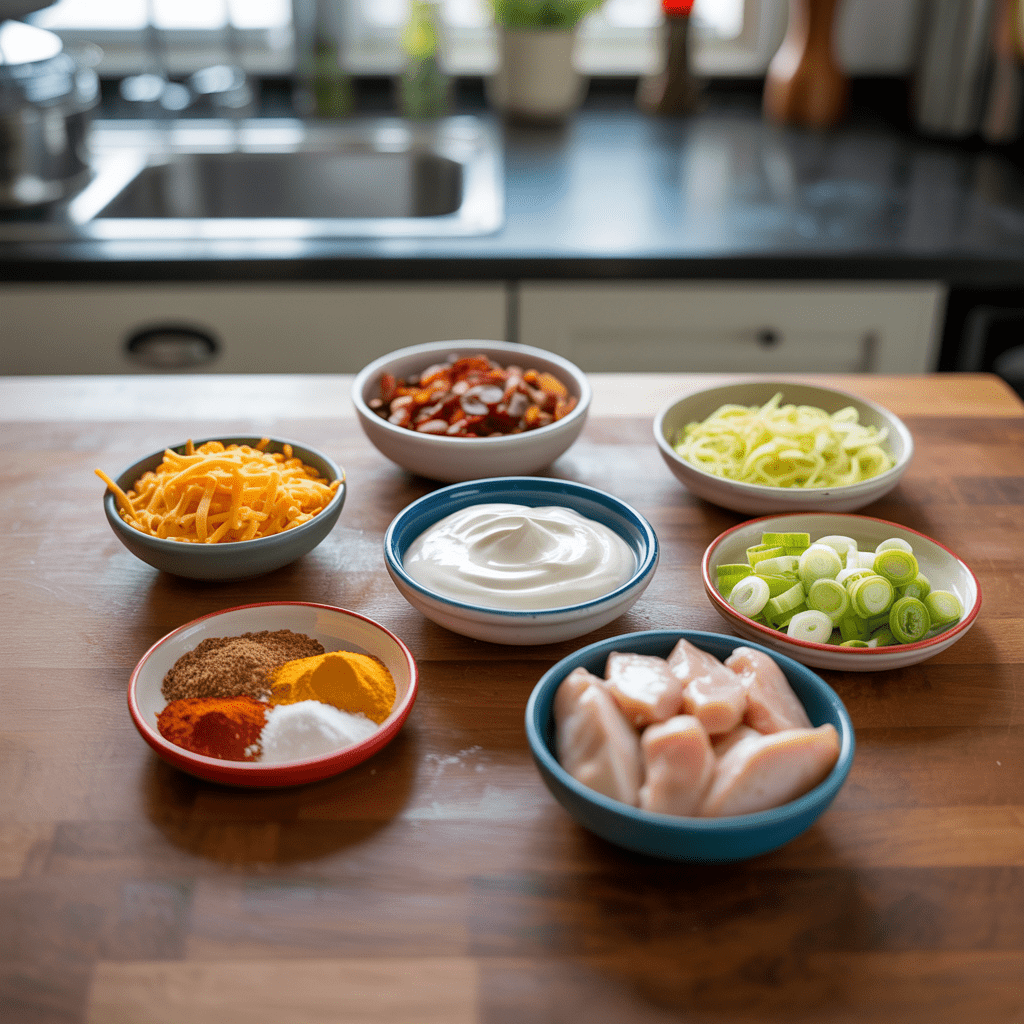
- 4 chicken cutlets, ½ inch thick, about 5 to 6 oz each (total 1¼ to 1½ lb)
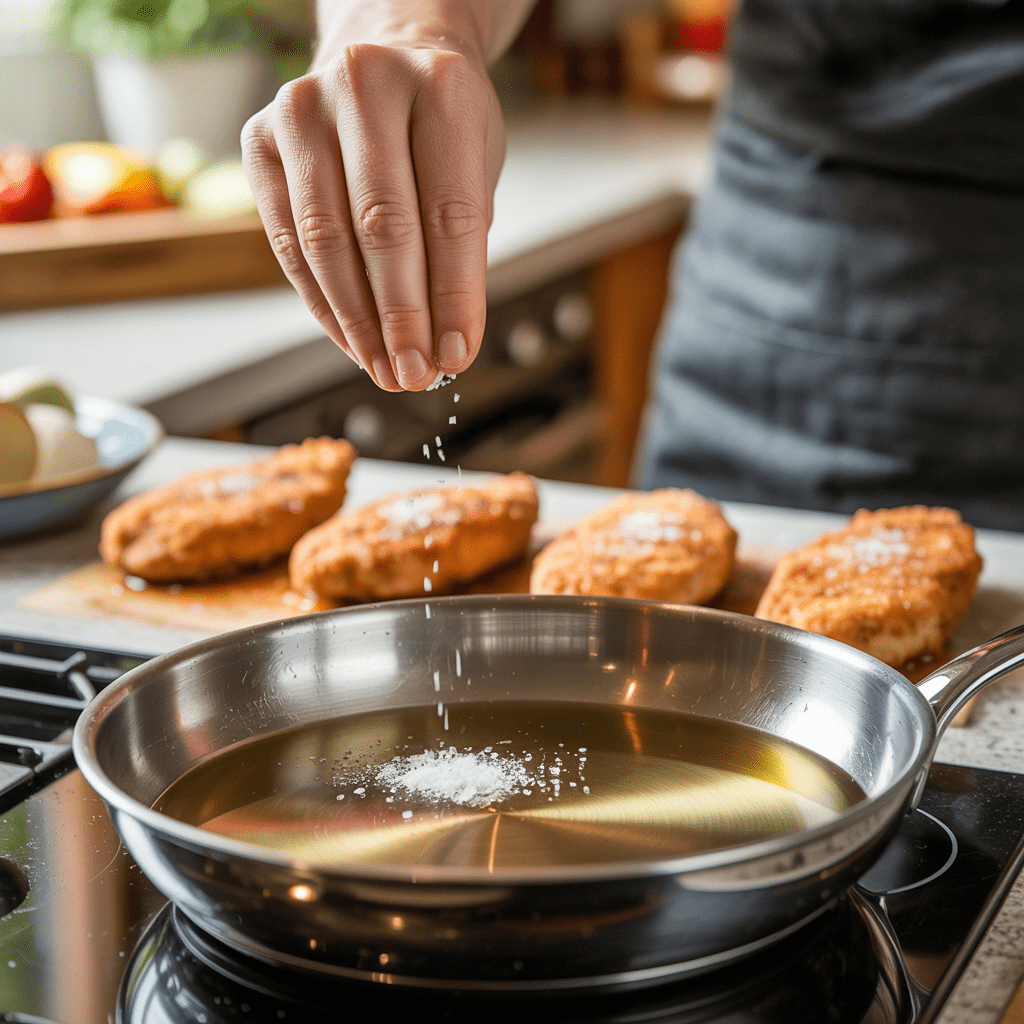
- 1 tsp kosher salt
- ½ tsp black pepper
- ½ tsp garlic powder
- ¼ tsp smoked paprika (optional but great)
- 2 tsp olive oil (for skillet)
- 4 slices bacon, cooked crisp and crumbled (about 2 to 2½ oz total)
- 1 cup shredded sharp cheddar (about 4 oz)
- 2 Tbsp thin-sliced green onions (scallions)
- 2 Tbsp plain Greek yogurt or light sour cream
- 1 tsp lemon juice or apple cider vinegar
- ½ tsp ranch seasoning or a pinch each of dried dill and onion powder
- 1 to 2 tsp water to thin the drizzle, as needed
Optional add-ons (choose 1 to 2):
- 2 Tbsp diced pickled jalapeños for heat
- 2 Tbsp diced tomatoes for freshness
- 1 small avocado, diced, for richness
- Hot sauce for serving
Required Tools
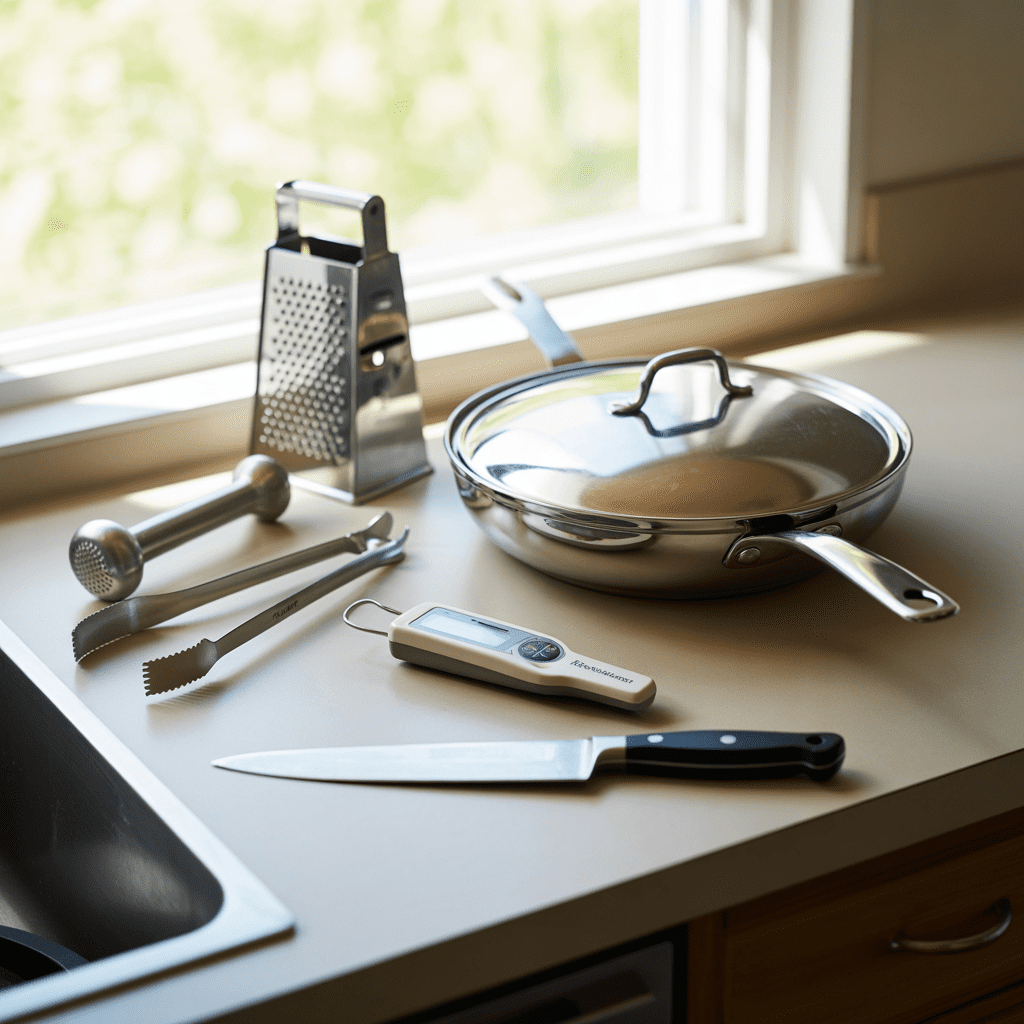
- 12-inch skillet with lid – wide surface for quick searing and a lid to steam-finish and melt cheese fast.
- Instant-read thermometer – the only reliable way to confirm 165°F (74°C) at the thickest point.
- Tongs – for safe, clean flips without tearing the cutlets.
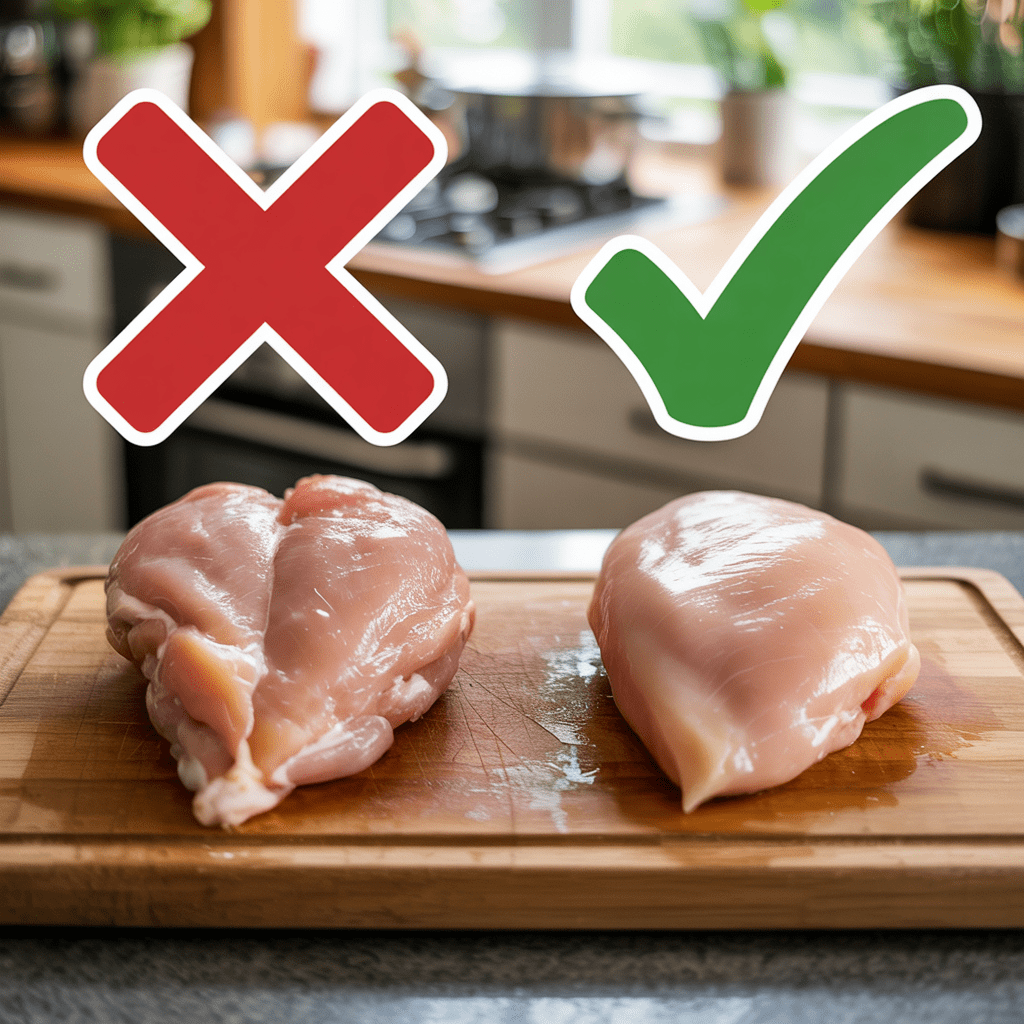
- Meat mallet or rolling pin – to pound breasts to an even ½-inch thickness.
- Sharp chef’s knife – for trimming and (if using) making pockets for stuffed chicken breasts.
- Cutting board – ideally two (one for raw poultry, one for toppings) to prevent cross-contamination.
- Box grater or microplane – freshly grated cheddar melts smoother and faster.
- Small bowl & spoon/brush – for seasoning mix and optional BBQ glaze.
- Sheet pan (variation) – for the quick loaded chicken and potato casserole or broiler finish.
- Aluminum foil or parchment – optional resting tent or easy sheet-pan cleanup.
- Kitchen scale (optional) – helpful for portioning and calculating 1lb of chicken breast protein precisely.
If you’re missing something:
- No thermometer yet? Cook times in the method will get you close, but prioritize buying a thermometer – it’s the biggest upgrade to juiciness and food safety.
- No lid? Use a tight foil tent to trap steam.
- No mallet? Pound with the bottom of a small saucepan.
Method: Step-by-Step Preparation Guide
1) Set up & season (2 minutes)
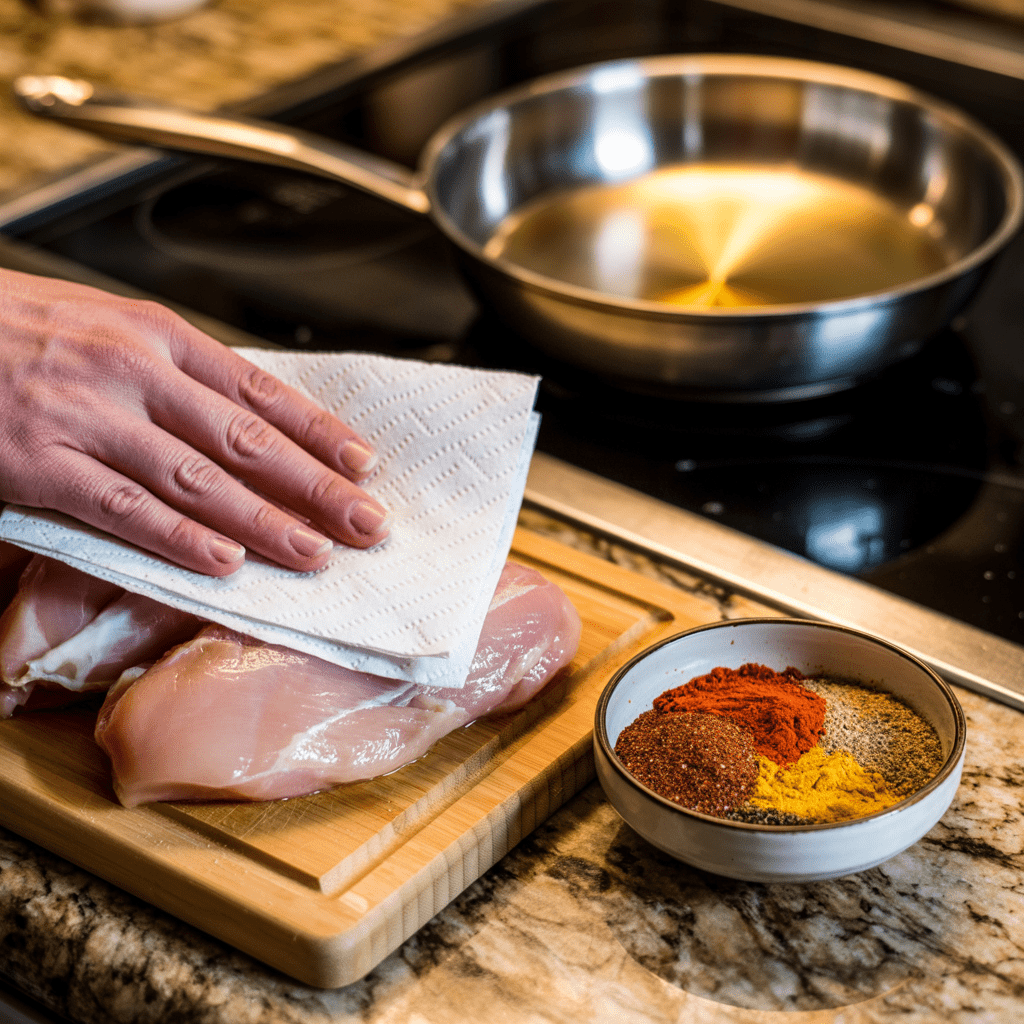
- Place chicken on a dedicated raw-protein cutting board. Pat very dry with paper towels (dry surfaces brown faster).
- In a small bowl, mix: 1 tsp kosher salt, ¾ tsp black pepper, 1 tsp garlic powder, ½ tsp smoked paprika.
- Season both sides evenly. Press the spices in so they adhere.
Why this matters: Dry surfaces + even seasoning deliver faster browning and consistent flavor.
2) Preheat the skillet properly (60–90 seconds)
- Add 2 tbsp olive oil to a 12-inch skillet and heat over medium-high.
- Readiness cues: Oil should shimmer (it looks wavy) and a tiny drop of water should skitter instantly. If it smokes hard, reduce heat slightly.
Why this matters: A hot pan gives you a quick crust, so the interior stays juicy.
3) First sear for color (about 2 minutes)
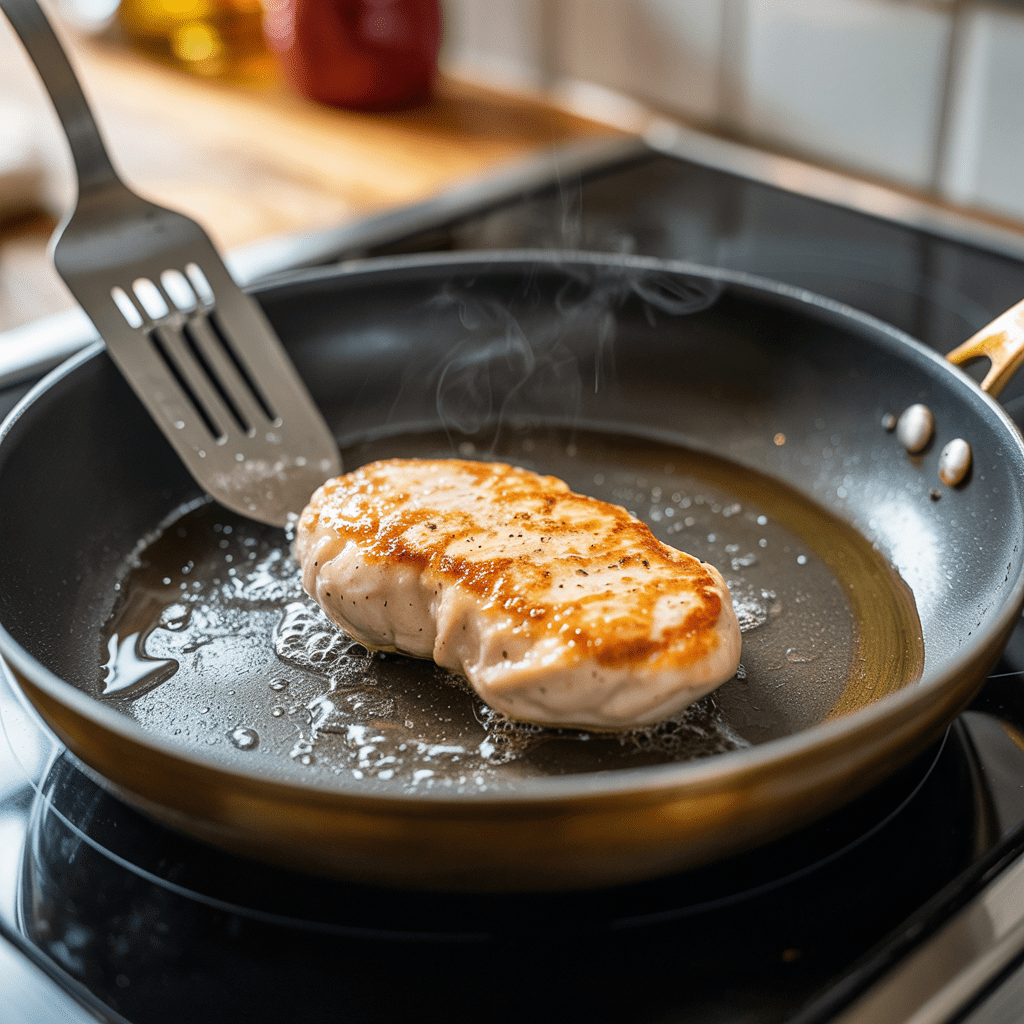
- Add the chicken without crowding (work in 2 batches if needed).
- Don’t move the cutlets for 90 to 120 seconds. You’re looking for golden edges and easy release with tongs.
Pro tip: If a piece sticks, give it 10 to 15 more seconds. Protein releases naturally once a crust forms.
4) Flip & sear side two (60 to 90 seconds)
- Flip each cutlet; aim for a second quick sear. You’re not cooking through yet – just building color.
- Check the underside after ~1 minute; once golden spots appear, you’re ready for the steam-finish.
5) Steam-finish + melt the “loaded” layer (2 to 3 minutes)
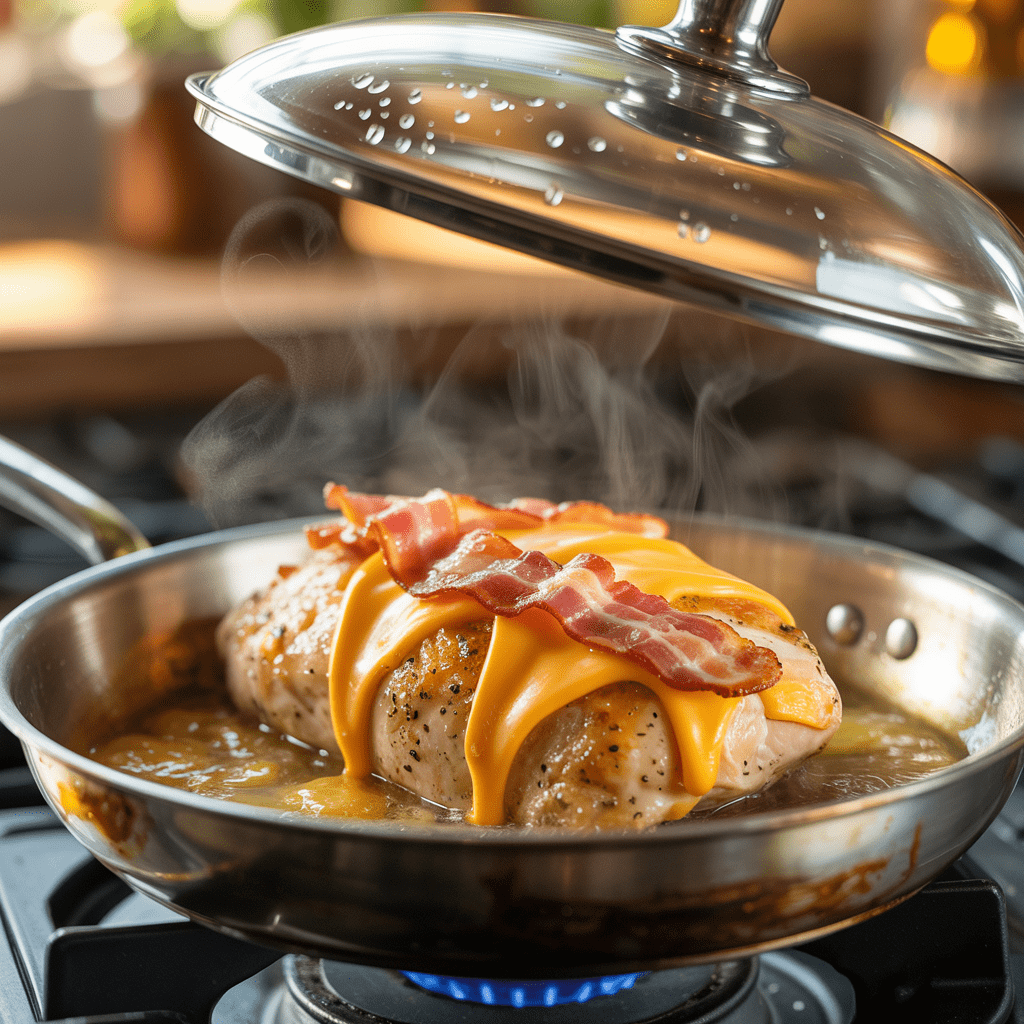
- Reduce heat to medium. Splash 1/2 tbsp chicken stock or water into the pan.
- Immediately top each cutlet with shredded sharp cheddar and crumbled bacon.
- Cover with a tight lid to trap steam. Cook 2/3 minutes, then check the thickest cutlet with an instant-read thermometer: target 165°F (74°C) at the center.
Visual cue: Cheese fully melted; edges glisten.
Audible cue: You should hear gentle sizzling under the lid, not aggressive popping.
6) Rest briefly & finish the “loaded” toppings (2 minutes off heat)
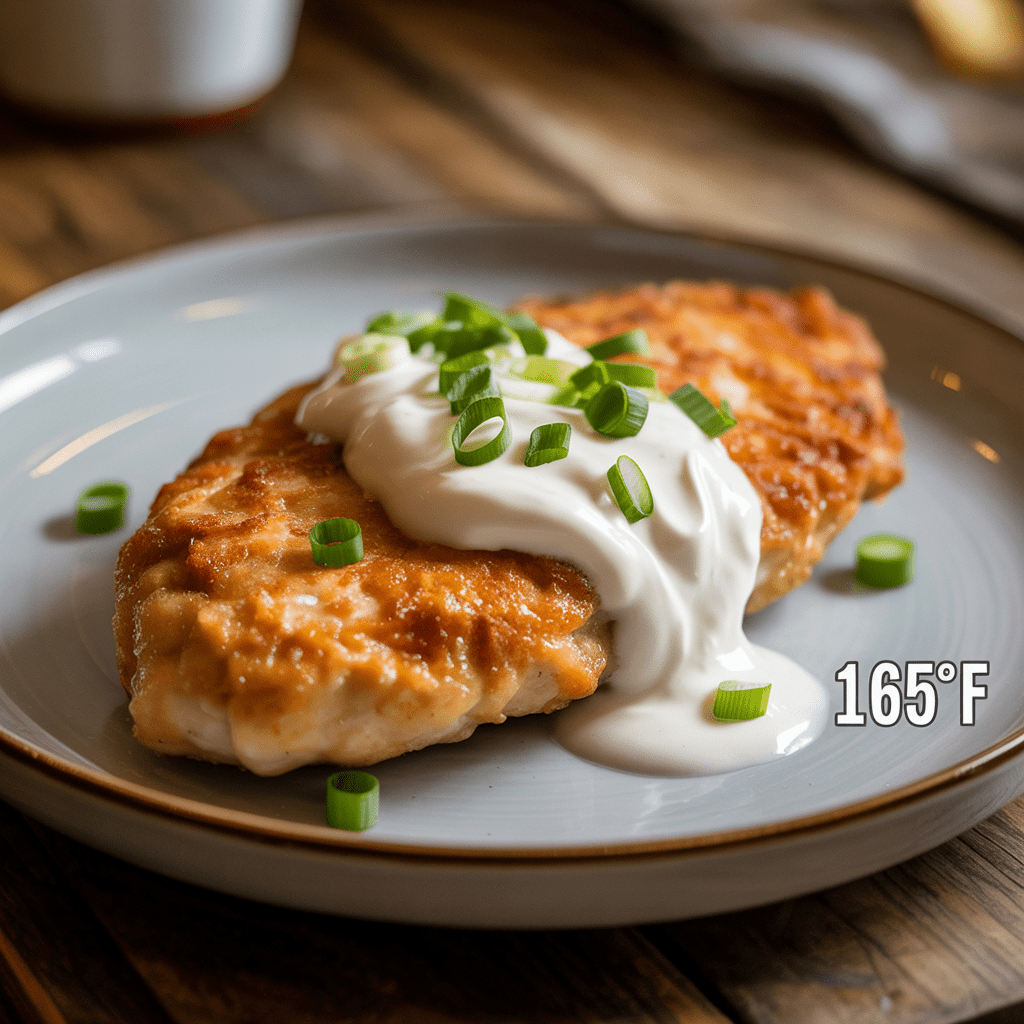
- Transfer chicken to warm plates or a sheet of foil (loose tent). Rest 2 minutes to let juices settle.
- Dollop sour cream (or Greek yogurt), then shower with sliced scallions.
Why this matters: The short rest polishes texture; cool-creamy + sharp-onion contrasts make the dish taste “loaded.”
7) Timing adjustments (use these if cutlets aren’t ½-inch)
- Thinner (⅓-inch / ~8 mm): Sear 60 to 90 sec per side, then steam-finish 1/2 min. Check temp sooner.
- Slightly thicker (¾-inch / ~2 cm): Sear 2 min per side, then steam-finish 3/4 min.
- Full breasts (un-split): Pound to even ½-inch first. If you can’t pound, pan-sear 2/3 min/side, then cover and cook on low with a splash of stock, checking every 2 minutes until 165°F.
8) Fast “loaded potato” side (parallel task, 5 to 7 minutes)

- While the chicken sears, microwave steam-in-bag baby potatoes (follow bag time). Lightly mash with 1 tbsp butter, salt, pepper. Spoon chicken and toppings over the potatoes for a quick loaded chicken potato vibe.
9) Flavor pivots (quick swaps that fit the base method)
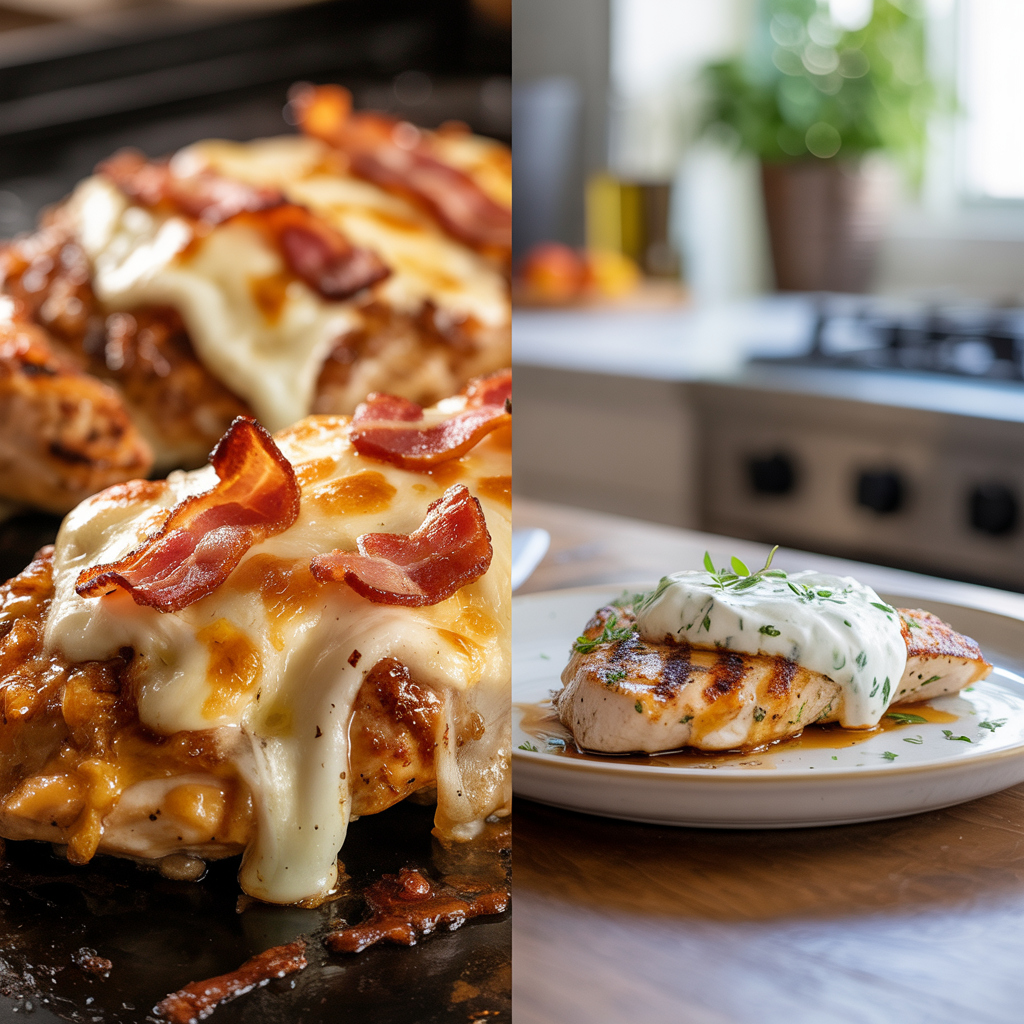
- BBQ glaze, “barbeque baked chicken breast” feel: After Step 4 (second sear), brush ⅓ cup BBQ sauce over the tops, cover 1 minute to set, then add cheese + bacon and finish covered until 165°F.
- Jalapeño-ranch: Swap sour cream for ranch and add pickled jalapeños with the scallions.
- Buffalo-blue: Toss finished cutlets with warm buffalo sauce, top with blue cheese and celery leaves.
10) Food-safe plating & cleanup (final minute)
- Use clean tongs for cooked meat (don’t reuse raw-meat tools).
- Wipe down the raw board area; sanitize knives and surfaces.
- Save pan fond for a 30-second pan sauce: splash 2/3 tbsp stock, scrape, whisk in 1 tsp sour cream and a pinch of pepper. Spoon around, not over, to preserve your melted cheese crown.
Key Benefits of Making Loaded Chicken Breasts
- Weeknight-fast: True 15-minute window with thin cutlets and preheated skillet.
- Pantry-friendly: Uses common staples like bacon, cheddar, and yogurt or sour cream.
- Macros that work: High protein plus controlled fats keep you full.
- Flexible cooking: Works in a skillet, air fryer, or under the broiler to finish the melt.
- Crowd-pleasing flavors: Smoky, salty, creamy, and fresh all in one bite.
- Meal-prep friendly: Cooks quickly and reheats well for lunches.
Mistakes to Avoid
Forgetting carryover heat: Pull from the direct heat as soon as 165°F registers; residual heat will finish melting and keep juices in.
Starting with thick breasts: Standard supermarket breasts are too thick to cook in 8 to 10 minutes. Butterfly and pound to ½ inch, or buy cutlets.
Cold pan, cold toppings: A cold pan leads to pale chicken and overcooking. Preheat the skillet until the oil shimmers. Have toppings chopped and ready.
Skipping the thermometer: Guessing doneness risks dryness or undercooked meat. Check for 165°F at the center.
Overcrowding the pan: Sear in two batches if needed. Crowding traps steam, preventing browning.
Adding cheese too early: Cheese should melt at the end. Early addition can burn or slide off before the chicken sets.
Expert Tips (Experience you can use)
- Cutlet control equals speed: In testing, ½-inch cutlets hit 165°F in 6 to 7 minutes of total skillet time. Thicker pieces pushed total time past 20 minutes and dried out before the center cooked.
- Season, then load: Seasoning directly on hot surfaces can scorch; season the chicken, not the pan. Add cheese and bacon only after flipping so the cheese melts into the newly seared, hotter side and stays put.
- Pan choice matters: Cast iron holds heat best for fast browning. Stainless works well if fully preheated; if the chicken sticks, wait another 30 seconds before moving it.
- Bacon workflow: Cook bacon while the skillet preheats, or keep a jar of pre-crumbled bacon from previous batches. A strip per serving adds plenty of flavor without overpowering.
- Macro tweaks: Swap cheddar for part-skim mozzarella to reduce saturated fat, or use turkey bacon. The yogurt drizzle adds creaminess with fewer calories than a heavy sauce.
- Family-style bar: Serve with a small topping bar (diced tomatoes, jalapeños, avocado, hot sauce). This lets heat-seekers level up without affecting everyone else.
Nutrition Facts (per serving)
Estimates using one 6-oz raw cutlet, 1 slice bacon, ¼ cup cheddar, ½ Tbsp olive oil total per serving, light yogurt drizzle.
- Calories: ~390
- Protein: ~47 g
- Carbohydrates: ~2 g
- Total fat: ~21 g
- Saturated fat: ~9 g
- Cholesterol: ~145 mg
- Sodium: ~780 mg
- Fiber: 0 g
- Sugar: ~1 g
Note: Values vary with brand and exact portions. For strict targets, calculate with your specific products.
Frequently Asked Questions
1) Can I use whole chicken breasts instead of cutlets?
Yes, but to stay under 15 minutes you should butterfly and pound to ½ inch. Whole, thick breasts will take 20 to 25 minutes in a skillet and risk drying out.
2) What cheese works best besides cheddar?
Monterey Jack, pepper jack, Colby, or part-skim mozzarella all melt beautifully. Smoked gouda adds depth; use a light hand because it is rich.
3) Is there a lighter option than bacon?
Turkey bacon crisps well and cuts saturated fat. You can also use 1 strip of standard bacon per 2 portions as a flavor accent.
4) How do I know the chicken is safe to eat?
Use an instant-read thermometer in the thickest point and confirm 165°F (74°C). Color is not a reliable indicator.
5) Can I make this dairy-free?
Yes. Use a plant-based shredded cheese that melts well, and swap the yogurt drizzle for a dairy-free yogurt or a simple olive-oil lemon dressing.
6) Best sides that keep dinner under 15 minutes?
Microwaved or air-fried baby potatoes, bagged salad with a lemon-olive oil dressing, or steamed green beans tossed with butter and salt.
7) How should I reheat leftovers without drying them?
Add a teaspoon of water, cover, and microwave at 50 percent power in 30-second intervals until hot. Or warm in a covered skillet over low heat 3 to 4 minutes.
Conclusion
Loaded chicken breasts deliver weeknight speed with steakhouse-level satisfaction. The key is thin, evenly sized cutlets, a truly hot pan, and “load” components staged so you can finish melting at temperature without overcooking. With the yogurt-ranch drizzle and bright scallions, you get balance, snap, and creaminess in every forkful. Use the thermometer, keep your pan hot, and you will have a reliable, 15-minute dinner that feels like a treat.
Loaded Chicken Breasts Are Ready In Just 15 Minutes