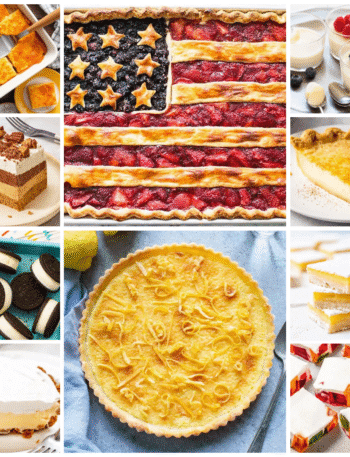
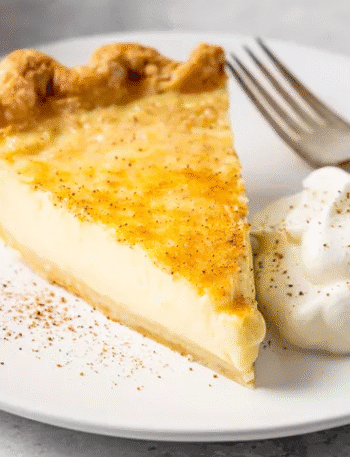
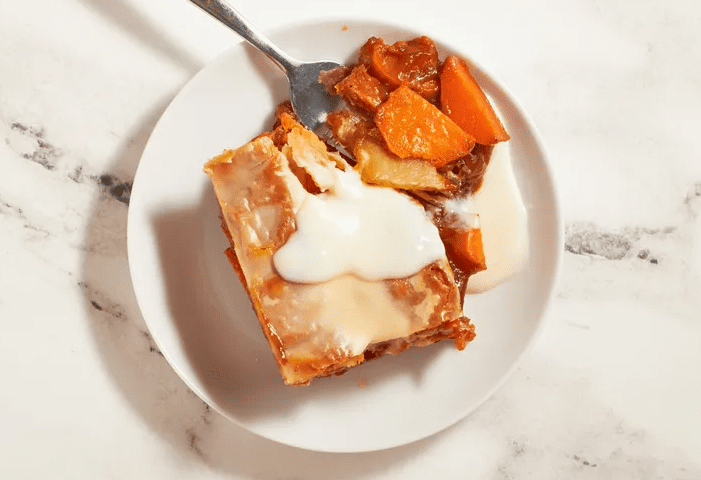
Sweet potato sonker is the kind of dessert that shows up on a crowded holiday table and quietly steals the show. It is a deep dish North Carolina dessert with tender slices of sweet potato tucked into a syrupy filling, wrapped in pie crust, and finished with a warm vanilla milk dip. This version follows the Surry County sonker tradition, where home cooks bake the dessert in a rectangular glass dish and pour sweet milk sauce over it near the end of baking and again at the table. I will walk you through each step so that even if you are new to baking, you can bring this old fashioned Southern dessert to your own kitchen with confidence.
Time and Serving
- Prep Time: about 30 minutes
- Cook Time: about 1 hour and 25 minutes
- Cooling or resting time: at least 20 minutes before serving
- Total Time: about 2 hours and 15 minutes
- Yield: 12 to 15 servings, enough for a holiday dessert table or a generous potluck spread
Insight of the Sweet Potato Sonker
1. A sonker is a regional North Carolina dessert that sits between a cobbler and a deep dish pie, usually baked in a rectangular pan with plenty of syrupy juices and a pastry crust.
2. In Surry County and nearby Yadkin Valley communities, families have used sonker since the eighteen hundreds as a way to turn seasonal fruit or sweet potatoes into a crowd friendly dessert for farm tables and community gatherings.
3. Sweet potato sonker is a special version that layers cooked sliced sweet potatoes in a pastry lined glass baking dish, covers them with a rich syrup, and finishes with a lattice crust on top.
4. A warm vanilla milk dip, similar to a thin custard or loose pudding, is cooked on the stove and poured over the sonker near the end of baking, with extra served at the table for each person to add.
5. Compared with cobbler, which often has biscuit or batter topping, and classic sweet potato pie, which is sliced into firm wedges, sweet potato sonker is deeper, juicier, and meant to be spooned into bowls. The texture sits closer to a very saucy deep dish cobbler than a firm pie.
6. Sweet potatoes connect the dessert closely to North Carolina agriculture. The state has led United States sweet potato production for many years, and sweet potatoes are recognized as the official state vegetable, so serving sweet potato sonker at holidays feels like a nod to local farms.
7. This dessert fits naturally on Thanksgiving and Christmas tables, at Sunday dinners, and at potlucks or church suppers where a large pan dessert that serves many people is especially welcome.
Ingredients
This recipe is designed for a standard home oven and a rectangular glass baking dish. It uses refrigerated pie crusts for ease, but you can swap in homemade pastry if you prefer.
For the sweet potatoes and syrupy filling
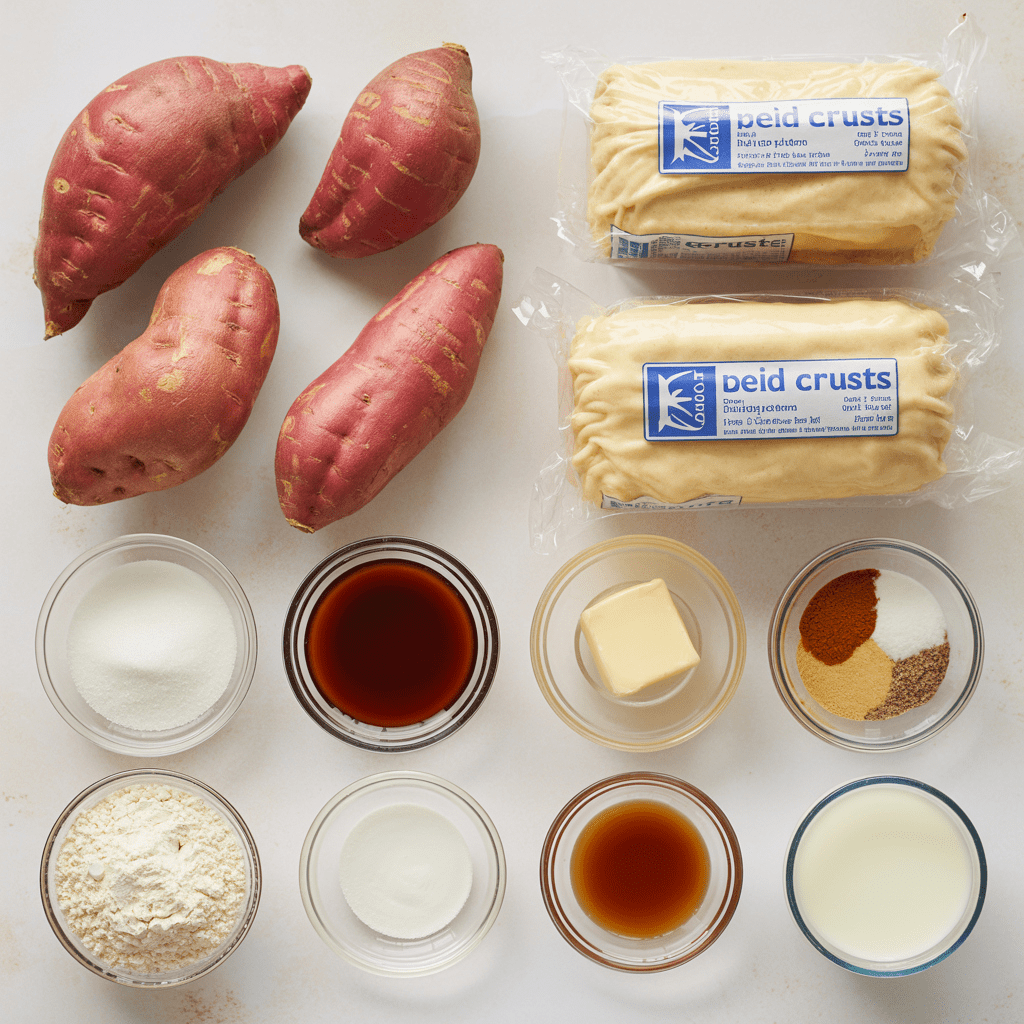
- Three pounds slender orange fleshed sweet potatoes, such as Garnet, peeled
- Cool water for cooking, enough to cover the sweet potatoes in the pot
- One and one half cups reserved sweet potato cooking water
- One and one half cups granulated sugar
- One half cup molasses or sorghum syrup
- One stick unsalted butter, melted, about four ounces
- One half cup all purpose flour
- One and one half teaspoons kosher salt
- One half teaspoon ground nutmeg
- One half teaspoon ground cinnamon, optional for extra warmth
Notes and substitutions
- Garnet sweet potatoes are a good choice because their long slender shape cooks evenly and their deep orange flesh makes the filling rich and colorful.
- You may use light brown sugar for part of the granulated sugar if you want a hint of caramel flavor. Reduce the molasses slightly if you do so to avoid an overly strong molasses note.
- Sorghum syrup is a traditional sweetener in parts of the South. It is usually a bit less bitter than molasses and can give the filling a gentle smoky sweetness.
For the crust
- Two boxes refrigerated pie crusts, four crusts total, at standard nine inch size
- All purpose flour for dusting the counter
- A little extra melted butter or milk for brushing the top crust, optional
Notes and substitutions
- Store bought refrigerated crusts hold up well in this very juicy dessert and stay tender under the syrup. Several Southern food writers note that sonker is one dessert where they are happy to lean on store bought crust for convenience.
- If you prefer a homemade crust, use enough dough for two deep dish double crust pies. You will need a bottom crust that covers a nine by thirteen inch dish and extra dough for a lattice top.
For the milk dip
- Three cups whole milk
- One quarter cup all purpose flour or cornstarch
- One half cup granulated sugar
- One quarter teaspoon kosher salt
- Two teaspoons vanilla extract
Notes and substitutions
- Whole cow milk gives the creamiest result. You can use two percent milk for a lighter sauce, though it will taste a little less rich.
- Nondairy milk such as oat or almond will thicken with flour or cornstarch but will not taste quite the same as traditional milk dip. If you use them, choose an unsweetened variety and taste as you go so the sauce does not become cloying.
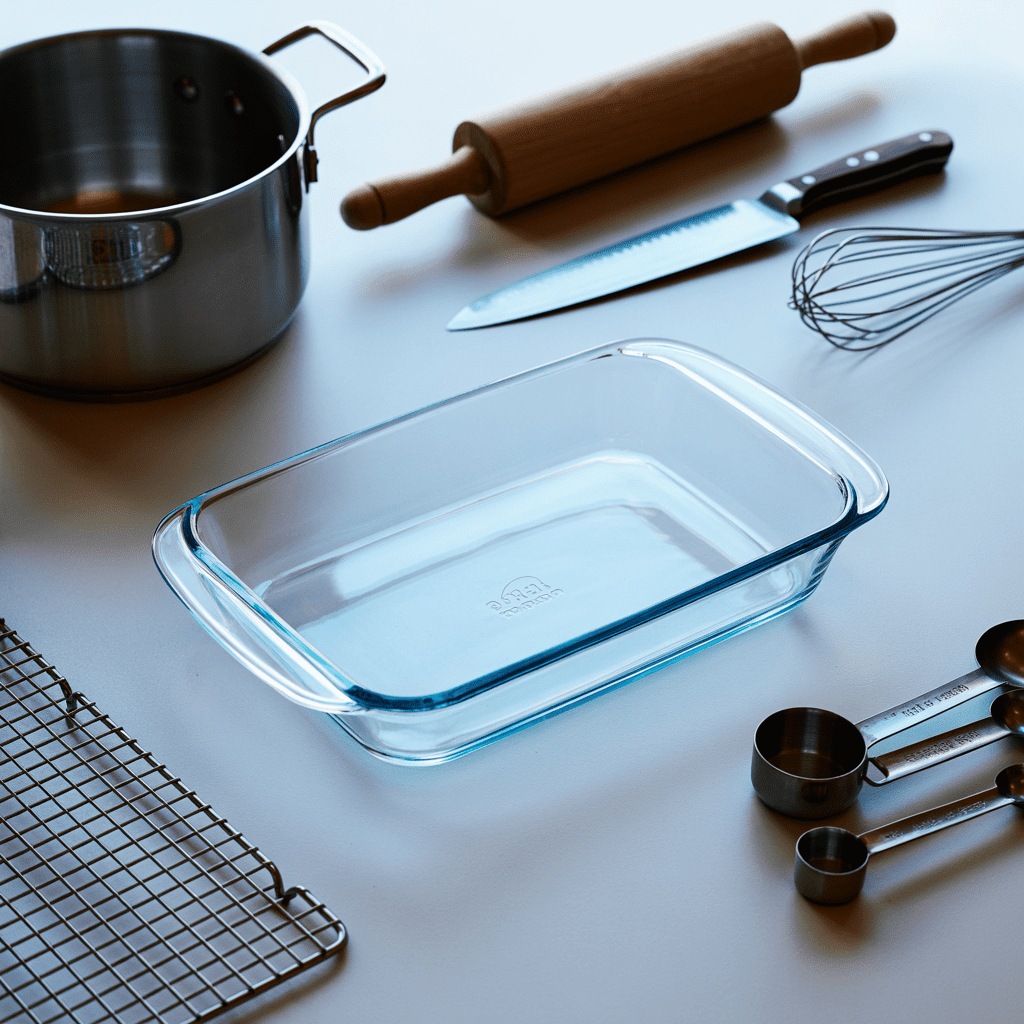
Required Tools for Making the Recipe
- Large pot for simmering the whole sweet potatoes. You want enough room for water to circulate so the potatoes cook evenly.
- Sharp knife and sturdy cutting board to slice the cooked sweet potatoes into even rounds.
- Nine by thirteen inch glass baking dish. Glass is helpful for this dessert because you can see the bubbling syrup around the edges and it conducts heat in a way that helps the filling set without staying overly soupy. Ceramic dishes tend to hold heat differently and may require more time while still leaving the center loose.
- Rolling pin to seal and extend the pie crusts so they line the dish and to smooth the crusts for lattice strips.
- Measuring cups and spoons for accurate ingredients.
- Medium bowl for mixing the syrup.
- Medium saucepan and whisk for cooking the milk dip until silky and pourable.
- Wire rack for cooling the sonker so the filling settles and the bottom crust firms slightly.
- Optional helpful tools: a bench scraper or small knife for trimming and lifting lattice strips, and an oven thermometer if you suspect your oven runs hot or cool. Consistent heat matters for getting the crust golden while the potatoes stay tender.
Method: Step by Step Preparation Guide
Step one: Prepare and cook the sweet potatoes
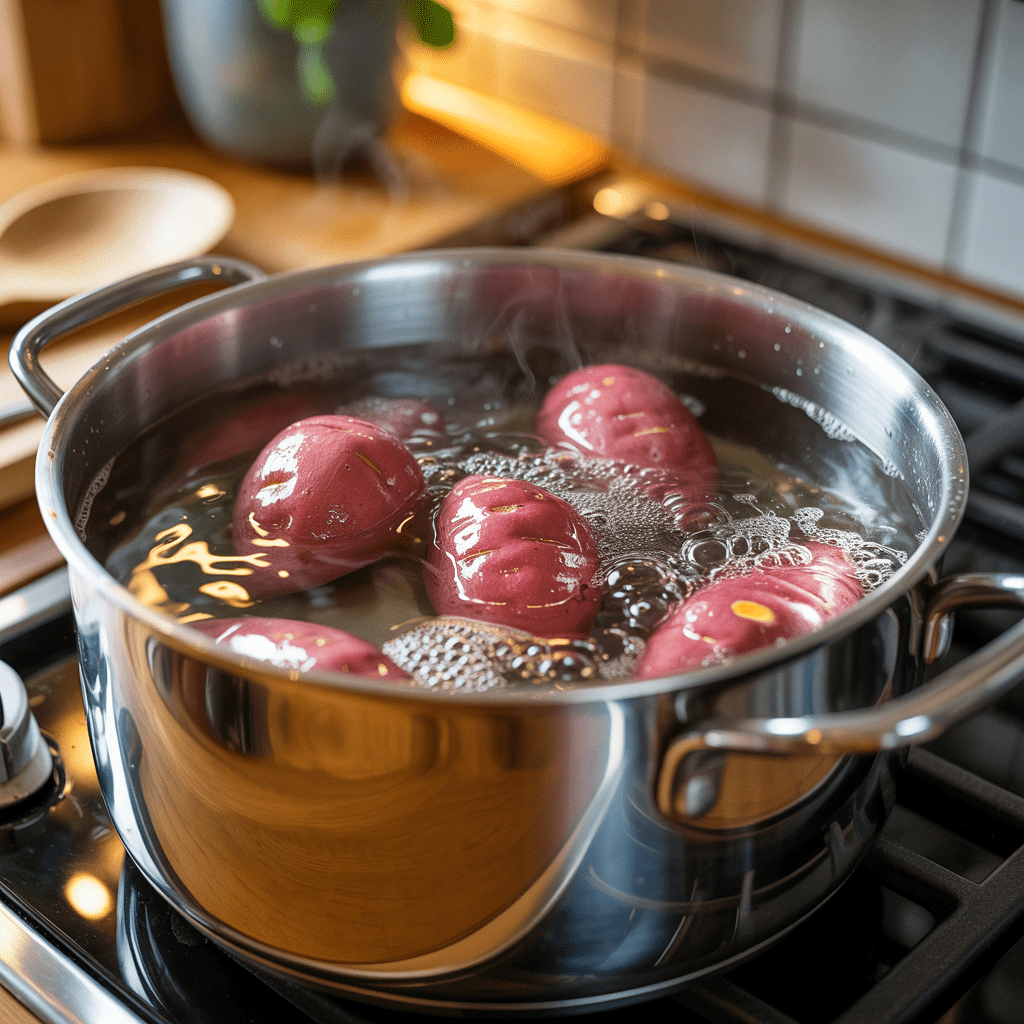
- Peel the sweet potatoes and trim any woody ends. Aim to keep them whole while cooking so they hold their shape later.
- Place the sweet potatoes in a large pot and cover with cool water by about one inch. Sprinkle in a teaspoon of the salt if you like, which lightly seasons the potatoes from within.
- Set the pot over medium high heat and bring the water just up to a boil. As soon as you see steady bubbling, lower the heat to maintain a gentle simmer. You want the surface to move with small bubbles, not a vigorous boil. Sources that specialize in sonker emphasize gentle cooking because a hard boil can cause the potatoes to break apart and turn mealy.
- Simmer until the potatoes are just tender when pierced with the tip of a knife, about fifteen to twenty minutes depending on thickness. The knife should slide in easily but the potatoes should still feel firm enough to slice.
- Use tongs to lift the sweet potatoes to a cutting board. Carefully ladle out and reserve at least one and one half cups of the cooking water. This starchy, lightly sweet liquid will help bind the syrup later, a method used in many traditional recipes.
- Let the potatoes cool until they are comfortable to handle, about five to ten minutes. Slice into rounds about one quarter inch thick. If a few slices crack or crumble, that is fine. Set aside.
Step two: Line the baking dish with crust

- While the potatoes cook and cool, remove two of the refrigerated pie crusts from the fridge. Let them stand at room temperature for about five to ten minutes until they are pliable but still cool.
- Lightly flour a clean countertop. Unroll both crusts and arrange them so that the edges overlap by several inches. Use a rolling pin to gently press the overlap together, then roll the dough into a large rectangle that will comfortably cover the bottom and sides of your nine by thirteen inch glass dish.
- Lift the dough and ease it into the baking dish. Press it into the corners and up the sides so you have a neat pastry shell. Try not to stretch the dough, which can cause shrinking in the oven.
- Place the lined dish in the refrigerator while you make the syrup and slice the potatoes. Chilling helps the fat in the crust firm up again, which supports flakiness and keeps the pastry from sliding down the sides during baking.
Step three: Make the syrupy filling
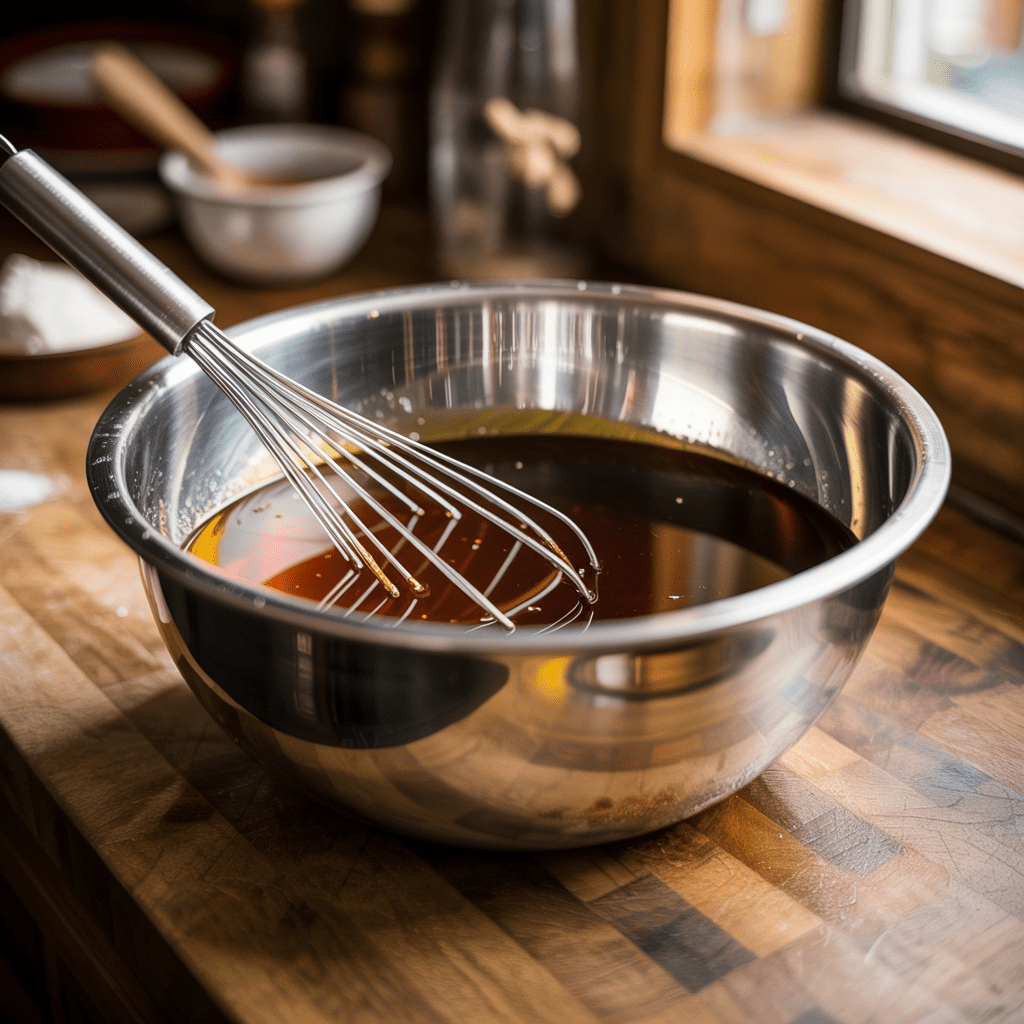
- In a medium bowl, whisk together the granulated sugar, flour, remaining salt, nutmeg, and cinnamon if using. Stirring the dry ingredients first helps prevent lumps.
- Pour in the melted butter and molasses or sorghum. Whisk until the mixture looks glossy and thick.
- Slowly add the reserved sweet potato cooking water while whisking. You are aiming for a smooth syrup that pours easily and feels slightly thicker than plain water. The starch from the cooking water will help the filling thicken in the oven without turning gluey.
- Taste a small spoonful. It will seem quite sweet at this stage, which is normal because the dessert is meant to be served in small portions with plain milk dip alongside. If you prefer a slightly less sweet dessert, you may hold back two to three tablespoons of sugar here or plan to use less of the milk dip later.
Step four: Assemble The Sonker
- Heat the oven to three hundred seventy five degrees Fahrenheit. Arrange a rack in the center of the oven.
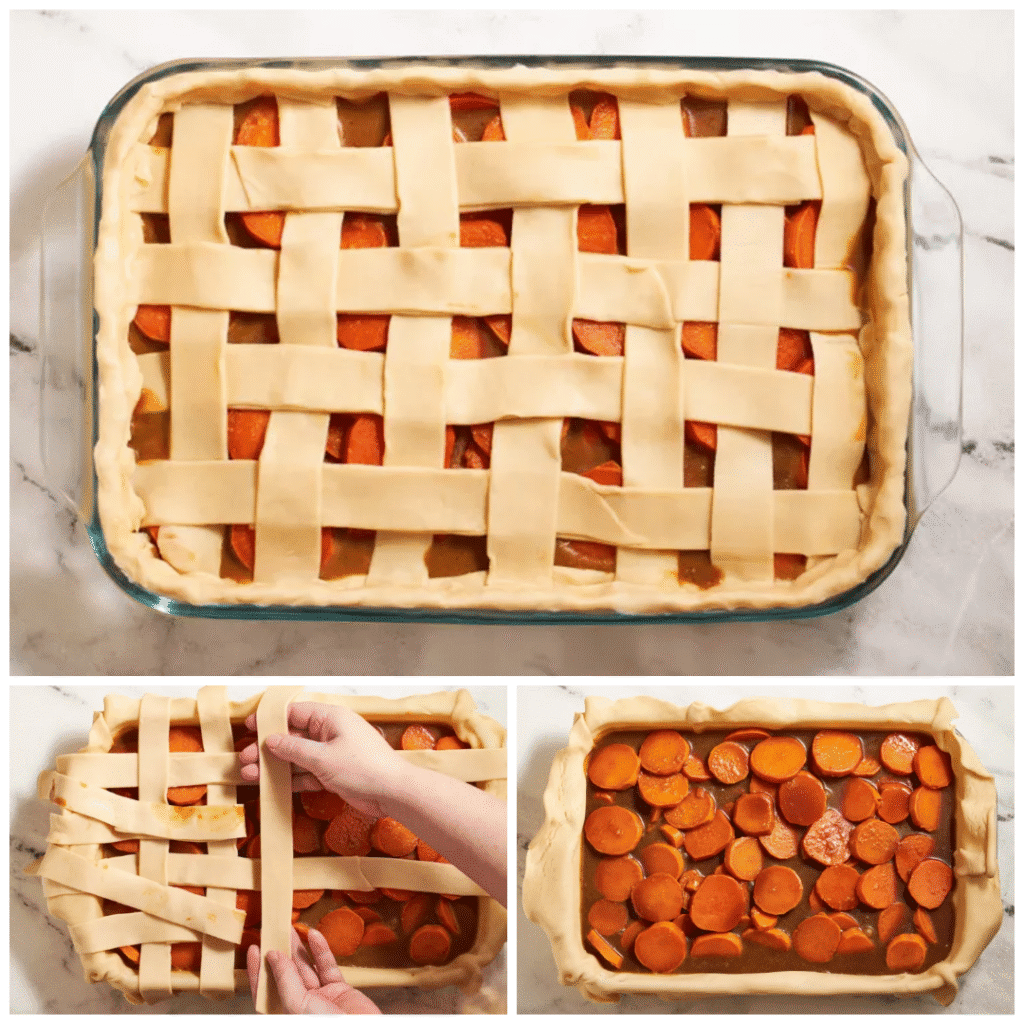
- Take the chilled crust lined dish from the refrigerator. Layer the sliced sweet potatoes evenly over the bottom crust. I like to create slightly overlapping rows, tucking smaller pieces into gaps so the pan is full.
- Pour the syrup slowly and evenly over the sweet potatoes. It will seep down between the slices and nearly cover them. Many traditional sources note that sonker is meant to look quite juicy at this stage, so do not worry if the potatoes seem almost submerged.
- Unroll the remaining two pie crusts onto a lightly floured surface. Use the rolling pin to smooth out any creases. With a sharp knife or pizza wheel, cut the dough into strips about one inch wide.
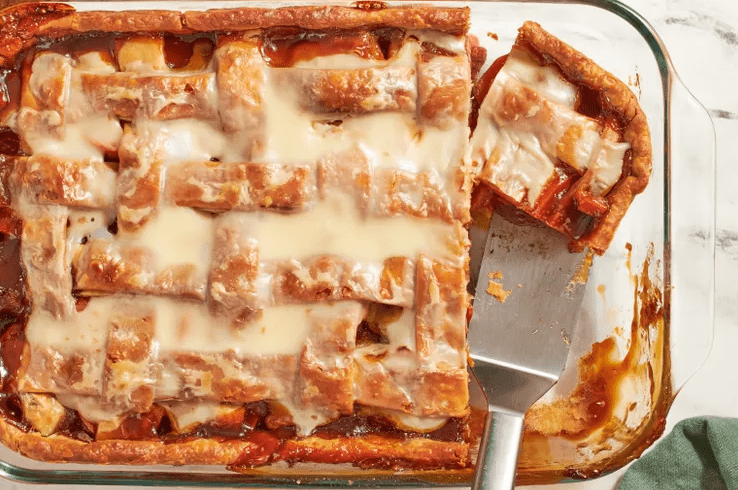
- To make a simple lattice, lay several strips in one direction across the pan, leaving small gaps between them. Fold back every other strip halfway, then lay a strip across at a right angle. Unfold the first set of strips, then fold back the alternate ones to weave the next cross strip. Continue this pattern until the surface is covered. Do not stress about perfection. A slightly uneven, rustic lattice fits this dessert.
- Fold any overhanging bottom crust up over the edge of the strips and pinch gently to seal. If you like, brush the lattice lightly with a bit of melted butter or milk to encourage browning.
Step five: Bake The Sonker
- Place the assembled sonker on a rimmed baking sheet in case any syrup bubbles over.
- Bake in the heated oven for about fifty minutes. You are looking for a deeply golden top crust and thick bubbling syrup visible around the edges and between the lattice strips.
- If your oven has hot spots and one side browns faster than the other, rotate the pan after about thirty minutes. Tent lightly with foil if the top is getting too dark before the filling looks active and bubbly.
Step six: Make the milk dip
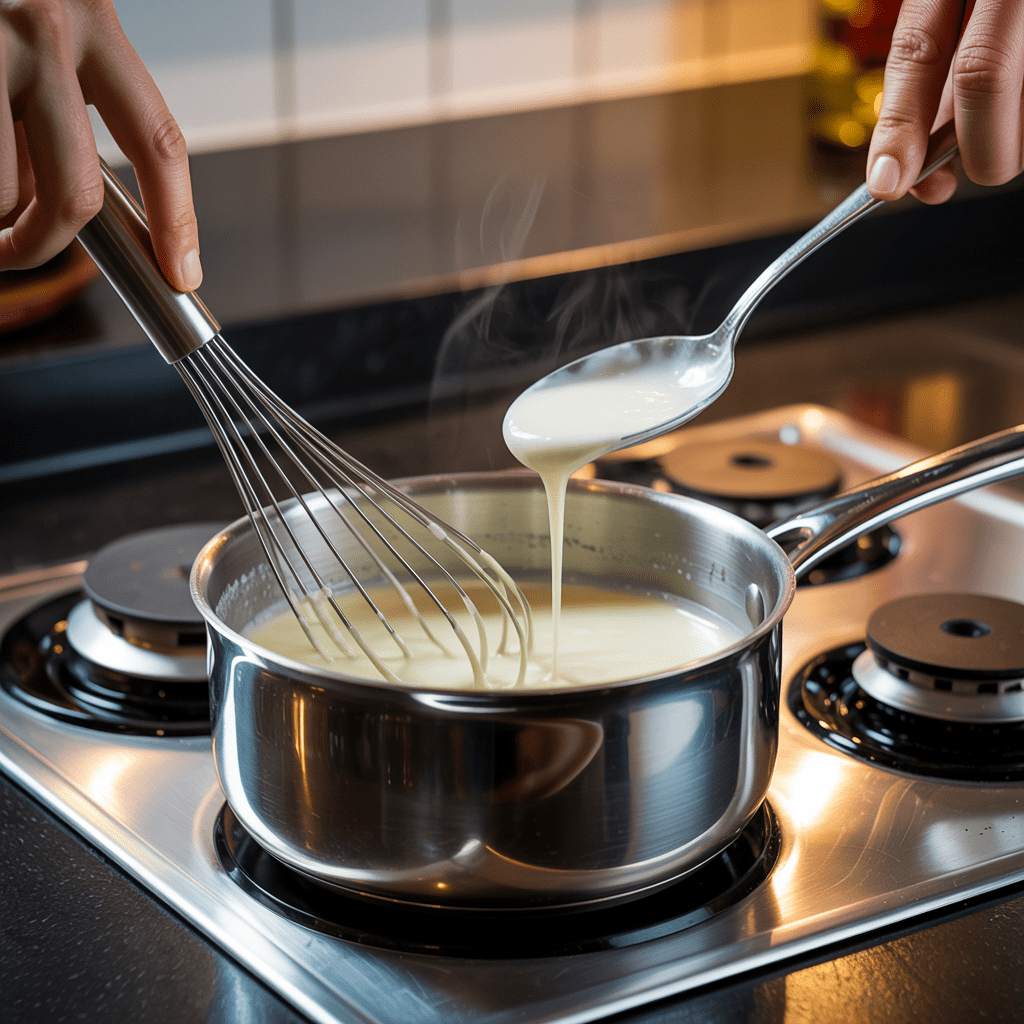
- While the sonker bakes, prepare the milk dip. In a medium saucepan, whisk the flour or cornstarch with a few tablespoons of the milk until completely smooth. This step prevents lumps later.
- Whisk in the remaining milk, sugar, and salt. Place the pan over medium heat.
- Cook, whisking often, until the mixture begins to steam and small bubbles appear around the edges. Then whisk continuously as it comes to a gentle boil.
- Continue to cook for about one to two minutes, whisking, until the sauce thickens to the texture of a loose pudding or thin custard. Food writers who specialize in sonker describe traditional milk dip as pourable rather than stiff, so it should still run off a spoon in a thick ribbon.
- Remove the pan from the heat and whisk in the vanilla. Taste and adjust for sweetness. Remember that the sonker itself is rich and sweet, so a slightly less sweet milk dip can create a better balance.
Step seven: Finish with milk dip and bake again
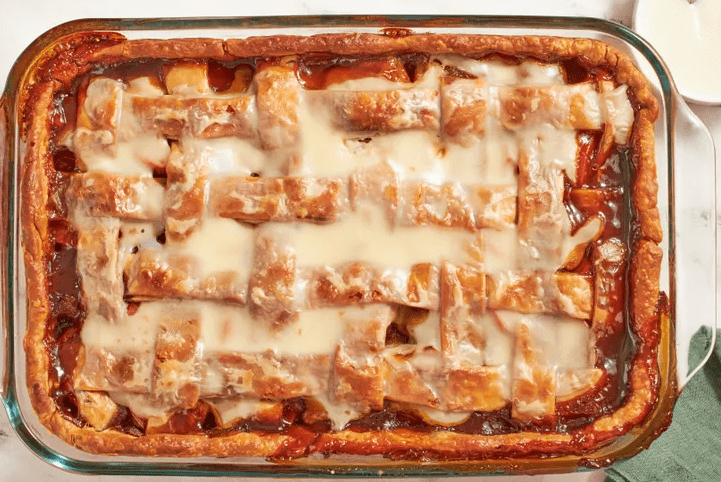
- After the sonker has baked for about fifty minutes and the crust is golden and the filling is bubbling, carefully remove the pan from the oven.
- Give the milk dip a quick whisk. Slowly pour about one cup of the warm sauce evenly over the top of the hot sonker, aiming to coat the lattice and let some sauce drip down into the gaps.
- Return the pan to the oven and bake for another fifteen minutes or so, until the milk dip on top has set into a shiny, lightly browned glaze in spots. This second bake helps the sauce cling to the crust and deepens the flavor.
Step eight: Cool, serve, and store
- Transfer the baked sonker to a wire rack and let it cool for at least twenty minutes. This rest allows the syrup to thicken slightly so the bottom crust is less fragile and the slices of sweet potato stay in loose layers rather than floating in a thin liquid.
- Rewarm the remaining milk dip just before serving. Place the saucepan over low to medium low heat and whisk in a splash or two of milk if the sauce has become too thick in the fridge. Sources that document sonker traditions point out that milk dip tends to firm as it cools and benefits from gentle reheating with a bit of extra milk.
- To serve, spoon warm or room temperature sonker into shallow bowls and pass the warm milk dip at the table so guests can pour as much as they like.
- Store leftovers tightly covered in the refrigerator for up to four to five days. This time frame aligns with general food safety guidance for cooked desserts containing dairy and eggs.
- To reheat, cover the dish with foil and warm in a three hundred fifty degree Fahrenheit oven until heated through. Reheat the milk dip gently on the stove with a splash of milk, stirring until smooth.
Inside this method you can adjust sweetness and spice. Use more cinnamon for a flavor closer to sweet potato pie or keep the nutmeg subtle for a more old fashioned taste. If you prefer a lighter dessert, use less milk dip on top and keep more of it on the side so people can serve themselves.
Key Advantages of Making Sweet Potato Sonker
- Uses familiar, inexpensive ingredients like sweet potatoes, milk, sugar, and store bought pie crust, yet the finished dessert feels special and rooted in North Carolina tradition.
- Feeds a large group comfortably. The deep dish format and rich filling make this ideal for family holidays, church suppers, or potlucks.
- Can be partly made ahead. You can cook and slice the sweet potatoes one to three days before assembling and baking, which spreads out the work on a busy holiday schedule.
- Offers a comforting alternative to classic pumpkin or sweet potato pie while keeping familiar flavors that picky eaters recognize. The texture is softer and more spoonable, which many people find cozy and nostalgic.
- Showcases sweet potatoes from regions where they are a major crop, especially North Carolina, which consistently leads national production.
Mistakes to Avoid
- Boiling the sweet potatoes too hard
If the water is at a rolling boil, the sweet potatoes can split and turn mealy, which makes it difficult to get neat slices. Keep the heat at a gentle simmer and pull the potatoes as soon as a knife slides in easily. - Forgetting to save the cooking water
The reserved cooking water contains starch and sweet potato flavor that help the syrup thicken and cling to the slices. If you forget to save it, you can substitute hot tap water, but the filling may be a little less rich and may take longer to thicken. - Using a baking dish that is too small or too shallow
A smaller pan can cause the syrup to bubble up and overflow, which makes a mess and leaves you with less sauce in the dessert. Stick with a nine by thirteen inch dish or one of similar capacity. Place it on a rimmed baking sheet to catch any drips. - Choosing the wrong pan material
Thick ceramic dishes hold heat differently and may leave the center of the sonker more liquid while the edges are already browned. Glass allows you to monitor bubbling and usually helps the filling thicken more evenly. - Overcooking or scorching the milk dip
Milk based sauces can scorch quickly if the heat is too high or if you stop whisking just as they come to a boil. Keep the heat at medium, whisk often, and once the sauce thickens to a loose pudding texture, remove it from the heat. - Cutting into the sonker too soon
It is very tempting to scoop into the dessert immediately, but if you cut it while it is still bubbling hot, the syrup will run and the bottom crust can tear. Give it at least twenty minutes to settle so the juices thicken and the crust has a chance to firm up.
Expert Tips and Real Life Examples
1. Divide the work to make life easier during busy holidays. Simmer and slice the sweet potatoes one evening, store them in the refrigerator, then line the dish, mix the syrup, and bake the sonker the next day before guests arrive.
2. Adjust sweetness and richness to suit your family. Keep the sugar amounts as written for a very sweet, old fashioned dessert, or reduce the sugar in the milk dip a little and serve extra on the side so each person can pour as much as they like.
3. For deeper flavor without extra heaviness, you can replace some of the white sugar in the syrup with light brown sugar. The molasses in the brown sugar adds a gentle caramel note that pairs well with sweet potatoes.
4. This dessert travels well for gatherings. Bake the sonker earlier in the day, let it cool for about an hour, then cover it loosely for the trip. Rewarm it gently in the oven at your destination while you reheat the milk dip with a splash of milk on the stove until it is silky and pourable again.
5. At family gatherings, people often go back for what they call a small taste that is really another full serving. Plan on generous portions, especially if guests discover the pleasure of spooning extra warm milk dip over their bowls.
6. For cleaner slices on a buffet table, let the sonker cool longer, even close to an hour, then cut it into squares with a sharp knife and lift each portion with a thin spatula. For more casual meals, simply spoon it into bowls straight from the pan.
7. Pair the dessert with lightly sweetened whipped cream, vanilla ice cream, strong coffee, or black tea. The cool cream and the bitterness of coffee or tea help balance the richness of the syrup and milk dip and keep each bite from feeling too heavy.
Nutrition Facts (Per Serving)
These values are estimated using the ingredient amounts in this recipe and typical nutrition databases, including data that align with similar published sweet potato sonker recipes. Actual numbers will vary based on the specific brands you use and any substitutions.
Per serving, assuming fifteen servings:
- Calories: about 580
- Total fat: about 23 grams
- Carbohydrates: about 90 grams
- Protein: about 7 grams
These values are approximate and should be considered general guidance rather than precise medical information.
Frequently Asked Questions
Q1: Can I use canned sweet potatoes instead of fresh ones
Yes, you can use canned sweet potatoes in a pinch, but the texture and sweetness will be different. Canned sweet potatoes are usually packed in syrup, which makes them softer and sweeter than freshly cooked ones. If you choose canned, drain them very well, pat them dry, and reduce the sugar in the syrup by at least a quarter to a third. The slices may be more fragile, so arrange them gently in the pan.
Q2: Can I substitute maple syrup or another sweetener for molasses or sorghum
Maple syrup works nicely and gives the filling a distinct maple aroma. Because maple syrup is less intense than molasses, the flavor will be softer and more delicate. You can also use a mixture of brown sugar and maple syrup, a combination recommended by some modern sweet potato sonker recipes. If you use honey, keep in mind that it can brown faster, so watch the top crust closely and tent with foil if needed.
Q3: How far in advance can I make sweet potato sonker and how should I store it
You can bake the full dessert up to one day in advance and store it tightly covered in the refrigerator. Reheat in a three hundred fifty degree Fahrenheit oven until warmed through and bubbly at the edges, then reheat the milk dip separately with a splash of milk. For longer lead time, cook and slice the sweet potatoes up to three days ahead and keep them chilled, then assemble and bake the sonker on the day you plan to serve it.
Q4: How do I reheat leftovers so the crust stays pleasant
For the best texture, reheat leftovers in the oven rather than the microwave. Cover the baking dish with foil and warm at three hundred fifty degrees Fahrenheit until hot in the center. The oven heat helps the crust crisp slightly again, while the foil keeps it from overbrowning. If you must use a microwave for a single serving, reheat gently at medium power and know that the crust will soften.
Q5: Can I make this dessert without the milk dip or with a lighter version
You can absolutely serve the sonker without milk dip. The dessert will taste more like a classic sweet potato cobbler with a simple syrup based filling. If you want a lighter version, use two percent milk and a little less sugar in the dip, and drizzle smaller amounts over each serving. Milk dip is considered a defining feature of traditional Surry County sonker, but home cooks often adjust the amount to suit their taste.
Q6: What other fruits or flavors work well in a sonker
Sonker is very flexible. Historic and modern recipes feature berries, peaches, apples, and even plums, all baked in deep pans with pastry and plenty of juice. Once you are comfortable with the method, you can try a half sweet potato and half apple filling, or add a handful of cranberries for color and tartness. Just remember to keep the total volume of fruit similar so the baking time remains close to this recipe.
Conclusion
Sweet potato sonker is more than just another dessert for your holiday table. It carries a story from a small corner of North Carolina, where home cooks have been baking deep pans of sweet potatoes and pastry for generations and serving them with warm milk dip to family, friends, and neighbors. The combination of tender sweet potatoes, flaky crust, syrupy filling, and silky vanilla sauce makes every bite feel like the coziest part of fall and winter.
Once you learn the basic method of cooking the sweet potatoes gently, saving the cooking water for the syrup, building a simple lattice, and finishing with milk dip, you can adapt the recipe to fit your schedule and your guests. Make it ahead for Thanksgiving, bring it warm to a potluck, or bake one on a quiet weekend and share generous bowls with people you love.
If this is your first sonker, I hope you will give it a try and let it become part of your own tradition. After a few batches you may find yourself reaching for different spices, mixing in other fruits, or tweaking the sweetness. That kind of personal touch is exactly how regional desserts stay alive in home kitchens.
Sweet Potato Sonker with Milk Dip – A North Carolina Holiday Dessert