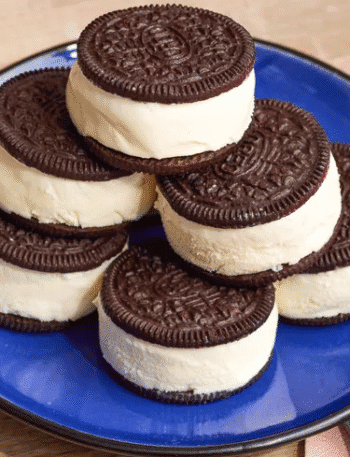
Lemon icebox pie is a creamy, tangy, refreshing old fashioned dessert with a graham cracker crust and a bright lemon filling that firms up into neat slices after a long chill. It is the kind of pie that feels nostalgic in the best way, especially topped with a cool sour cream topping. In this guide, you will learn exactly how to mix it, bake it, chill it, and top it so it sets with confidence. It is also wonderfully make ahead friendly, which means less stress on serving day.
Time and Serving
Prep time: about 20 minutes
Cook time: about 35 minutes total
Chill time: 6 hours 45 minutes minimum
Total time: about 7 hours 40 minutes
Servings and yield: 6 to 8 servings, one 9 inch pie
Simple make ahead timeline example
Make the crust and filling at 10 in the morning, bake and cool by noon, then chill all afternoon. Add the sour cream topping at 6 in the evening, bake briefly to set, chill again, then slice after dinner. Or go fully overnight for the easiest schedule.
Insight of the Lemon Icebox Pie

An icebox pie is a pie that sets up in the refrigerator until it becomes sliceable. Traditionally, these pies were a smart way to make a cool dessert before modern air conditioning, and they often used pantry staples plus citrus for that bright punch.
This lemon icebox pie earns its dense, creamy texture from a combination of sweetened condensed milk, egg yolks, a whole egg, and fresh lemon juice. The lemon brings the sharp, tangy flavor, and it also helps the mixture thicken quickly as you stir. The short bake finishes the job by gently setting the egg mixture so the filling holds its shape.
The sour cream topping is not just decoration. It adds a soft, cool tang that keeps the sweetness in check, and the brief bake helps the topping set so it does not slide when you cut.
Ingredients

For the crust
Option A: store bought
• 1 prepared 9 inch graham cracker crust, fully cooled
Option B: quick homemade graham cracker crust
• 1 and 1 half cups graham cracker crumbs
• 2 tablespoons sugar
• 1 pinch fine salt, optional but helpful
• 6 tablespoons unsalted butter, melted
Crust notes
• A store bought crust is convenient and reliable.
• Homemade gives a fresher toasted flavor and a sturdier slice if you pack it firmly.
• If your crumbs taste a little flat, that pinch of salt wakes up the crust.
For the lemon filling
• 2 large egg yolks
• 1 large whole egg
• 2 cans sweetened condensed milk, 14 ounces each
• 1 cup fresh lemon juice
• 1 to 2 teaspoons finely grated lemon zest, optional for extra brightness
• 1 pinch fine salt, optional
• 1 half teaspoon vanilla extract, optional, for a rounder flavor
Filling notes
• Use fresh lemon juice for the cleanest, brightest flavor. Bottled juice can work, but the flavor is usually less lively.
• Egg yolks plus a whole egg give structure and that classic creamy custard like feel.
• Sweetened condensed milk is essential here. Evaporated milk is not a swap.
For the sour cream topping
• 1 and 1 half cups sour cream
• 2 tablespoons sugar
• 1 teaspoon vanilla extract
Topping notes
• Full fat sour cream sets and slices best.
• Stir gently until smooth so the topping stays creamy, not airy.
Required tools for making the recipe
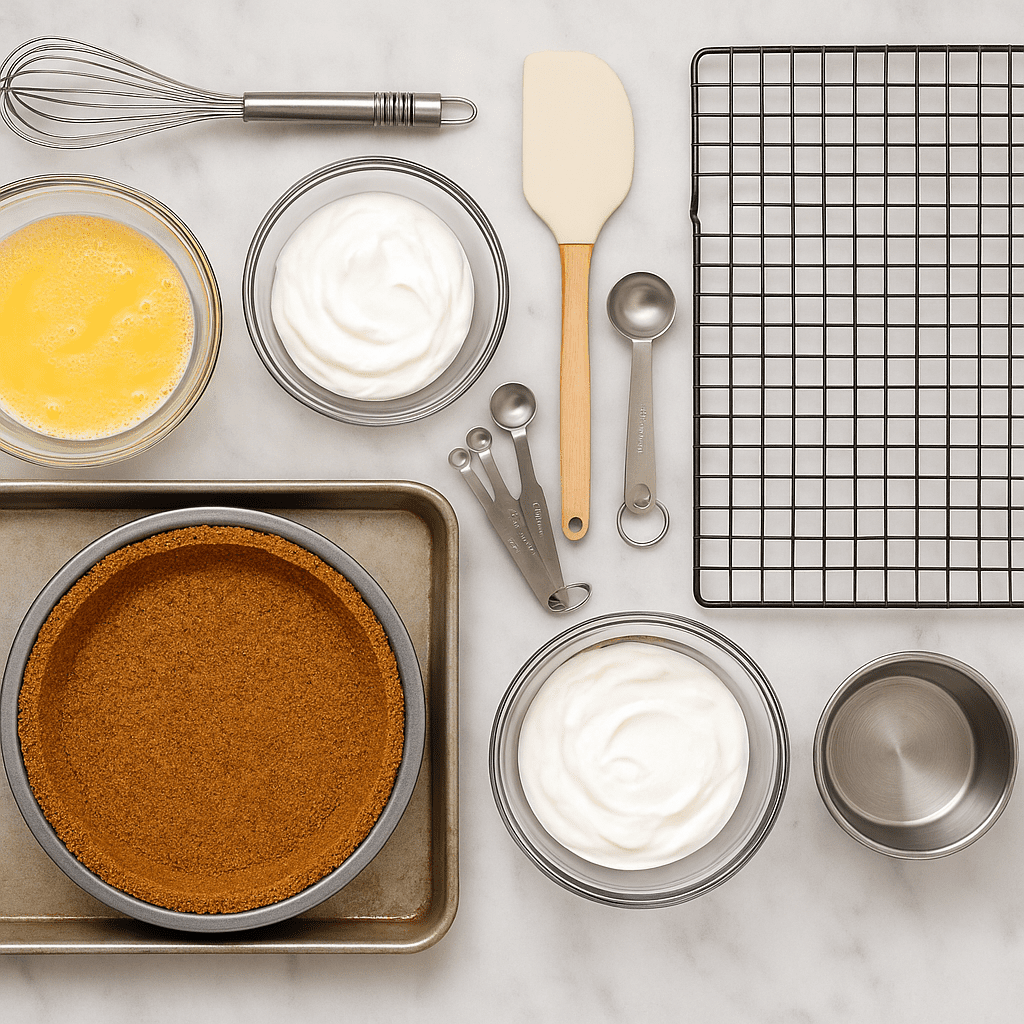
• Mixing bowls
• Whisk
• Measuring cups and spoons
• Rubber spatula
• 9 inch pie pan, if making a homemade crust
• Baking sheet for stability and easier oven handling
• Cooling rack
• Microplane or fine grater for zest, optional
• Refrigerator space with a flat spot for the pie
• Instant read thermometer, optional for an extra done-ness check
Method: Step by step preparation guide
Step 01: Oven setup and pan positioning
Heat the oven to 350 degrees F and set a rack in the middle. Place a baking sheet on the rack now. You will bake the pie on the sheet so you can slide it in and out without bending the crust.
Step 02: Choose your crust path
If using a store bought graham cracker crust:
Make sure it is fully cooled and firm. Set it on a baking sheet.
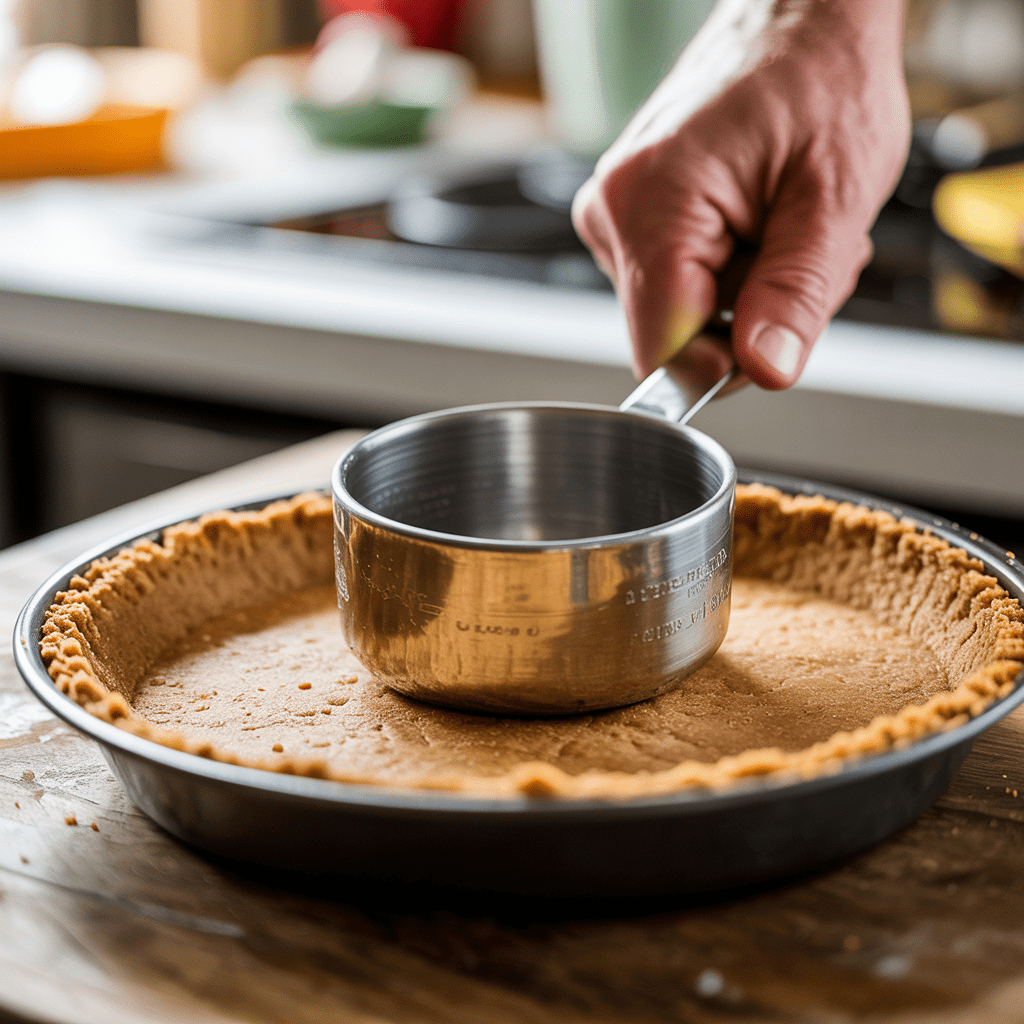
If making a quick homemade graham cracker crust:
- In a bowl, mix graham cracker crumbs, sugar, and salt.
- Pour in melted butter and stir until the crumbs look evenly moistened, like wet sand.
- Tip into a 9 inch pie pan and press firmly across the bottom, then up the sides. Use the bottom of a measuring cup to pack it tight. The tighter you pack, the cleaner your slices later.
- Bake for 10 minutes, then cool completely on a rack.
Step 03: Mix the filling with texture cues
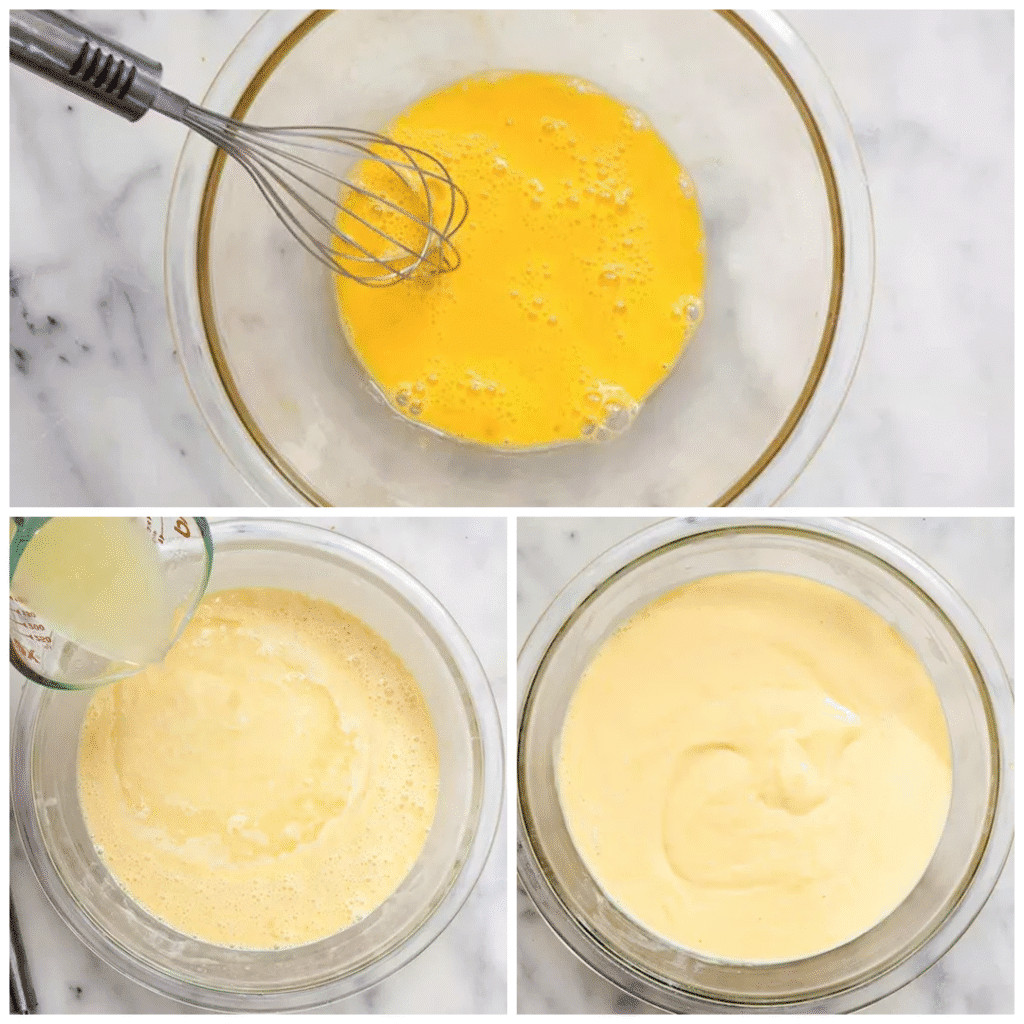
- In a medium bowl, whisk the egg yolks and the whole egg until the mixture looks smooth and unified, with no streaks.
- Add sweetened condensed milk and whisk until fully blended and glossy.
- Add fresh lemon juice slowly while whisking. Within a minute, you should see the filling thicken slightly. It should look creamy and a little more resistant to the whisk, like a loose pudding.
- Stir in lemon zest, salt, and vanilla extract if using.
Visual cue: If the mixture still looks thin like plain milk, keep whisking for another 30 to 60 seconds. The thickening is part chemistry, part thorough mixing.
Step 04: Fill the crust neatly
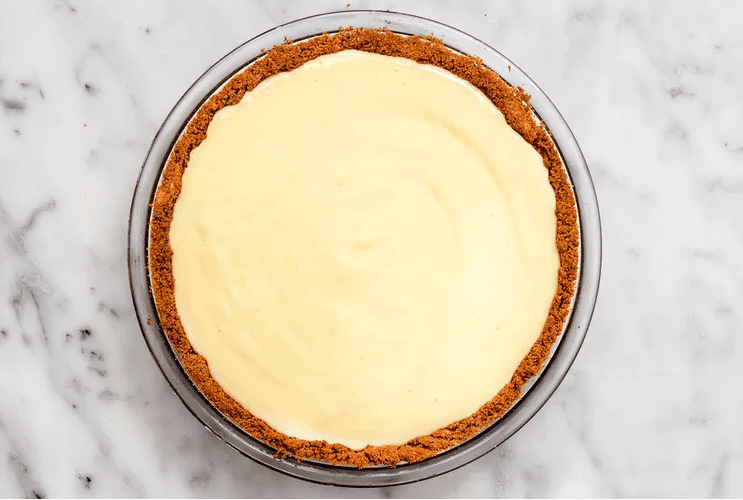
Pour the filling into the cooled graham cracker crust. Use a spatula to smooth the top. Tap the pie gently on the counter once or twice to pop bigger air bubbles.
Step 05: Bake with done-ness cues
Slide the baking sheet with the pie into the middle of the oven. Bake about 25 minutes.
What you are looking for:
• The edges set and look slightly puffed.
• The center jiggles slightly when you nudge the pan, like gentle gelatin, not like a liquid wave.
• The surface should look glossy and set, not wet.
Optional thermometer check: Egg based dishes are considered safely cooked at 160 degrees F, according to USDA guidance for egg dishes. If you want to use this extra check, aim for about 160 degrees F in the center without hitting the crust.
Step 06: Cool properly before chilling
Move the pie to a cooling rack and let it cool to room temperature. Do not cover it while warm or you can trap steam and soften the crust.
Once it is no longer warm, cover lightly and chill in the refrigerator at least 6 hours, ideally overnight.
Food safety note: Custard style pies should be refrigerated and are generally recommended to be stored for 3 to 4 days after baking. FoodSafety.gov Keep your refrigerator at 40 degrees F or below for safe storage. U.S. Food and Drug Administration
Step 07: Make the sour cream topping
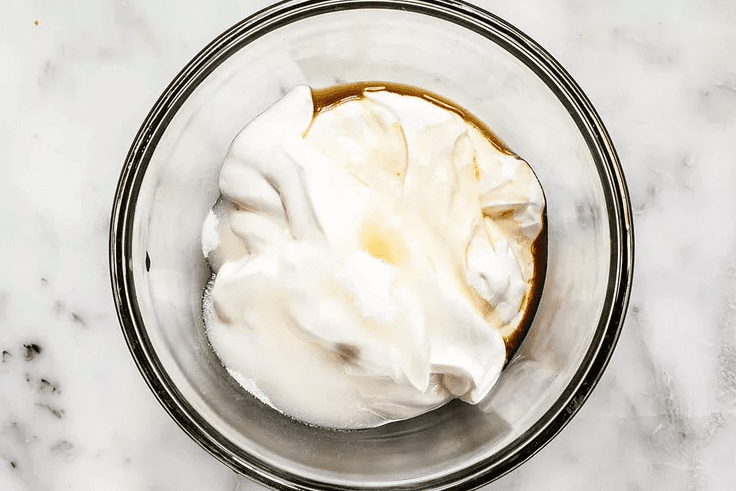
In a bowl, stir sour cream, sugar, and vanilla extract until smooth. Do not over-mix. You want it creamy, not fluffy.
Step 08: Spread the topping cleanly
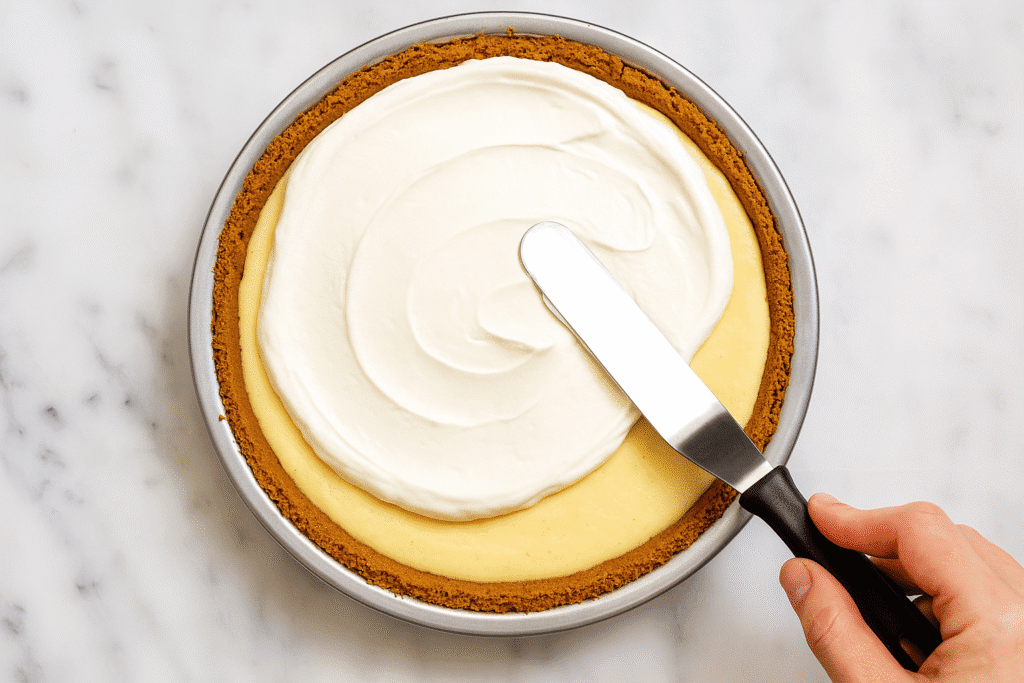
Take the chilled pie from the refrigerator. Dollop topping across the surface and spread gently to the edges with an offset spatula or the back of a spoon. Try not to dig into the lemon layer. Light pressure is your friend.
Step 09: Brief bake to set the topping, then chill again
Heat the oven to 350 degrees F again. Bake the topped pie for 10 minutes, just until the sour cream topping looks set and slightly more matte.
Cool briefly on a rack, then return the pie to the refrigerator for at least 45 minutes before slicing.
Step 10: Slice like a pro
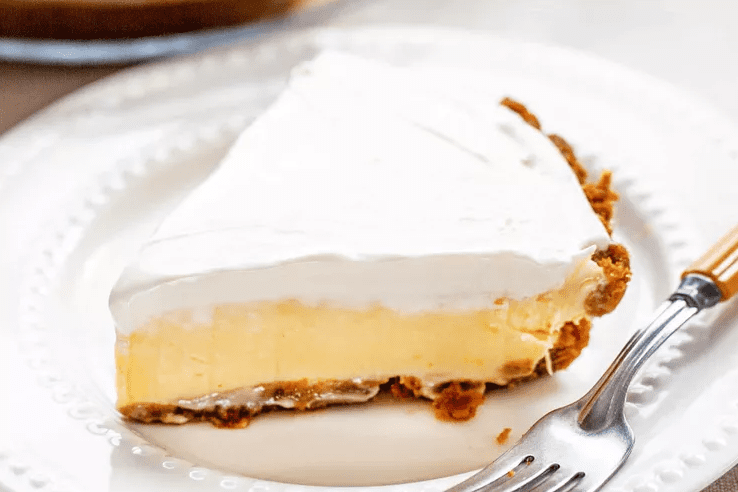
For clean slices, use a thin sharp knife and wipe it between cuts. If the pie is very firm from an overnight chill, let it sit at room temperature for about 5 minutes so the knife glides.
How to know it is ready
Properly baked filling
• Edges set
• Center jiggles slightly
• Surface looks set, not wet
Optional: around 160 degrees F in the center if you choose to check, consistent with USDA guidance for egg dishes Ask USDA
Properly chilled pie
• The pie feels firm when you gently press the center through plastic wrap
• Slices hold straight sides instead of slumping
• Flavor tastes brighter after chilling because the lemon reads more clearly when cold
Properly set topping
• Looks smooth and set, not runny
• Does not slide when you tilt the pie slightly
• Cuts cleanly with the knife, leaving a neat white layer
Variations
Lime version
Swap fresh lemon juice for fresh lime juice. Keep the same amount. Add lime zest for an even more refreshing finish. This version tastes like a cousin of key lime pie, with the same creamy structure.
Extra bright version with zest
Add 2 teaspoons lemon zest to the filling and an extra pinch of salt. Zest boosts the lemon aroma without adding more acid, so you get brighter flavor without risking a filling that tastes sharply sour.
Lighter topping options
• Soft whipped cream topping: Skip the sour cream topping step and top slices at serving time with lightly sweetened whipped cream. This is lighter but less tangy.
• Half sour cream, half whipped cream: Fold softly whipped cream into sweetened sour cream right before serving. This keeps the tang but feels airier. Do not bake this version.
Crust swaps
• Vanilla wafer crust: Use vanilla wafer crumbs in the same quantity as graham crumbs.
• Gingersnap crust: Great if you like warm spice with lemon.
• Shortbread cookie crust: Very nostalgic and buttery.
No bake style note
Many no bake lemon pies rely on chilling alone and may use different ratios or additional thickeners. Because formulations vary widely, I cannot confirm a single no bake method as both reliably set and equivalent to this baked egg based version without testing that specific formula.
Key advantages of making Lemon Icebox Pie

• Make ahead friendly for parties and holidays
• Simple ingredients that are easy to find
• Great warm weather dessert because it is served chilled
• Crowd pleasing slice dessert that feels nostalgic without being fussy
• Tangy, creamy filling that pairs well with berries, tea, and coffee
Mistakes to avoid
Runny filling
Why it happens: under-baking, not enough chill time, or measuring lemon juice short.
How to prevent: bake until edges set and center jiggles slightly, then chill at least 6 hours. Measure fresh lemon juice accurately.
How to fix: If the pie is already chilled and still loose, give it more refrigerator time. Sometimes it firms up after an overnight rest.
Over-baking
What it looks like: a puffed center that cracks, or a filling that turns slightly grainy.
How to prevent: pull it when the center jiggles slightly. The pie continues to set as it cools and chills.
Too tart or too sweet
Balance tip: lemon flavor can feel sharper after chilling. If you prefer less tang, use the zest heavy approach and keep the juice at 1 cup, rather than adding more juice. If you want more tang, add zest first before increasing juice.
Grainy topping
Why it happens: over-mixing cold sour cream or using low fat sour cream that breaks.
How to prevent: stir just until smooth, and use full fat sour cream for the most reliable texture.
Soggy crust
Why it happens: filling poured into a warm crust, or covering the pie while it is still warm.
How to prevent: cool the crust completely, cool the baked pie to room temperature uncovered, then chill.
Expert tips and real life examples
I treat this lemon icebox pie like a two day dessert, even when I make it in one day. The flavor is better and the slices are cleaner after an overnight chill. If I am serving it for guests, I bake the filling the day before, chill overnight, then add the sour cream topping in the morning or early afternoon.
A small tweak I learned after making it repeatedly: a tiny pinch of salt in the filling makes the lemon taste more lemony, not salty. Another practical habit that saves stress is baking the pie on a baking sheet every time. It makes transfer safer and prevents the crust edge from cracking when you pull it from the oven.
Serving ideas that really work:
• Fresh berries on the side to add color and a little natural sweetness
• Extra lemon zest over the top right before serving for aroma
• A small spoon of whipped cream on each slice if you skipped the baked topping
• A crisp cookie on the plate for texture contrast
For clean slices, I keep a mug of hot water next to the cutting board. Dip the knife, wipe it dry, slice, then wipe again. It feels like extra work, but the neat layers make the pie look bakery sharp.
Nutrition facts (Per serving)
These are estimates only, since brands and crust choices vary.
Approximate per serving, assuming 8 slices:
• Calories: about 620 to 720
• Fat: about 24 to 32 grams
• Carbohydrates: about 80 to 100 grams
• Protein: about 10 to 16 grams
• Sugar: about 60 to 80 grams
Frequently asked questions
Q1: Can I make it the day before
Yes. This pie is at its best after an overnight chill. Make the filling and bake it the day before, chill overnight, then add the sour cream topping the next day.
Q2: How long does it keep in the fridge
Custard and chiffon style pies are generally recommended for 3 to 4 days refrigerated after baking. Keep it refrigerated and aim to serve it within that window for best texture.
Q3: Can I freeze it
I do not recommend freezing it. FoodSafety.gov lists custard and chiffon pies as not recommended for freezing. Even when freezing is safe for some foods, this style tends to thaw with a weepy, separated texture.
Q4: Can I use bottled lemon juice
You can, but the flavor is usually less bright than fresh lemon juice. If you use bottled, consider adding lemon zest to bring back aroma. I cannot verify a universal bottled brand equivalence because acidity and flavor vary by product.
Q5: What if I only have one can of condensed milk
Make a half batch in a smaller dish. Use 1 can sweetened condensed milk, 1 egg yolk plus about half a whole egg, and 1 half cup fresh lemon juice, then bake it in a smaller pie pan or an 8 inch square dish and cut into bars. Bake time may be a little shorter, so rely on the edges set and center jiggles slightly cue.
Q6: How long can it sit out while serving
Because this pie contains eggs and dairy, follow the two hour rule for perishables and return it to the refrigerator promptly. FDA guidance advises refrigerating perishables within 2 hours, or within 1 hour if the environment is above 90 degrees F. U.S. Food and Drug Administration
Conclusion

Lemon icebox pie is one of the easiest ways to get a creamy, tangy, refreshing dessert that feels nostalgic and special without complicated technique. Focus on three things and you will be happy every time: mix until the filling thickens slightly, bake until the edges set and the center jiggles slightly, then give it the full chill time in the refrigerator. Plan ahead, keep it cold, and do not be afraid to tweak zest and topping style to match your perfect lemon level.
Lemon Icebox Pie – That Slices Clean and Tastes Like Summer